Wednesday, February 22, 2012

And the Nominees Are....

Sunday, February 26th ,is one of my {favorite} nights of the year, Oscar Sunday. I have watched the Oscars every year since I was 6. I love the clothes, the thrill, the anxiousness as the nominees are read & I just get a lump in my throat as the winner chokes out their acceptance speech through elated tears of joy & surprise....it's just awesome....and I would be a liar if I said that I haven't practiced my own acceptance speeches - I'll use one of them someday.

Since I think it would be so much fun to have an Oscar party with all of you, Nan & I have decided to have a virtual one. Full of fashion, flair, favorite moments & FOOD.

Be sure to cast your online Oscar Ballot and choose who you think should win the Oscars on Sunday night. Go to My Picks & make your votes & make sure you click "Play with Friends" so we can compare. {If you are not friends with She Said do it now!!} It's a tough ballot this year, I think, because there are a lot of "normal" or mainstream movies that are up for nominations.

Michelle's Best Film Prediction: I am tempted to go with "Tree of Life". I haven't seen it, but it seems to fit the usual Oscar mold, but I am going with "The Help". I think it was a great adaptation (very few films can get that credited to them) and really strong performances.

Michelle's Favorite Oscar Moment: I actually have two. There has been many a speech & many a sketch that I have enjoyed, but these two have stuck with me:
1. When Roberto Benigni won the Oscar in Best Foreign Film for "Life Is Beautiful". I am sure that everyone who wins an Oscar feels like standing on chairs and taking their bows. The excitement and the beautiful speech he gives really encompasses, for me, a true Oscar moment. {I also really love how the entire audience is excited with him & how Stephen Spielberg gives him a hand to balance with.}


2. The speeches that Glen Hansard & Marketa Irglova gave when they won Best Song for "Falling Slowly". I still get choked up watching it. They were the total underdogs and they won it! Not only do I say Amen to Glen's "Make Art", but to date Marketa is the only person who has been invited back onto the stage to give a speech, and Thank you Jon Stewart for doing that, it's a beautifully humble speech....just love it.


What Food Would Michelle Bring to the Oscar Party:
to honor  "Money Ball" (ballpark fare) & "Extremely Loud & Incredibly Close" (NY fare) I would make Cracker Jack by the Brown Eyed Baker & Copy Kat's Mall Pretzels
to honor "The Artist" (a black & white movie) and "Extremely Loud" - again because these are famous in NY - Annie's Eats Black & White cookies

Nan's Picks
I also enjoy the Oscars, but I don't watch them as religiously as Michelle does.  I've always wanted to have an Oscars party, though -- in fact, Michelle and I talked a couple of times in high school about hostessing one -- so I'm glad we can have a virtual party with all of our She Said friends!!

Best Picture - I'm going with "The Help" all the way!  I loved the movie and the book is even better.  If you haven't seen/read it yet, don't delay!  Do it right now!  I do think "Extremely Loud and Incredibly Close" has a fair shot, though.

Favorite Oscar Moment - I have to agree with Michelle on this one -- definitely Roberto Benigni jumping around.  Another silly moment (but still dear to my heart) was when "Titanic" won best picture and James Cameron crowed, "I'm the king of the world!!"  Michelle and I both (along with several other friends) saw "Titanic" in the theater multiple times and were mildly obsessed with it (and Leo, of course...*swoon*).

Food for the Oscar Party: I like what Michelle's bringing! :)  I would bring a chocolate pie like this one in honor of "The Help" and a batch of butterbeer to represent "Harry Potter".
What about you??  What are your picks?

Infographic: All about Oscar and the Academy Awards

Photobucket

Saturday, February 18, 2012

Beverly's Snickerdoodles

When I was growing up, there was an older lady named Beverly who was like the grandma in our church congregation (at least I thought so).  Beverly was super sweet, teeny-tiny, and visited our home regularly to chat with my mom.  When my mom was president of the women's group at church (aka Relief Society), she and her presidency put together a cookbook of cherished recipes from our congregation's members.  I was only about seven years old at the time they undertook this project, but I have my very own dog-eared copy of the completed cookbook.  Beverly contributed many of her time- and kid-tested recipes to the collection, including this snickerdoodle recipe.  I started baking snickerdoodles using her recipe when I was a teenager, and they are one of my absolute-favorite cookies.  Beverly passed away several years ago, and even though I don't specifically recall eating snickerdoodles that she'd made herself, I still love feeling a little connection to her when I use this recipe.

So, without further ado, I proudly present...
 

1 c butter/margarine/shortening (I like to use 1/2 c butter and 1/2 c shortening)
1 c sugar
2 eggs
2 tsp cream of tartar
2 3/4 c flour
1 tsp baking soda
1/2 tsp salt

2 T sugar + 2 tsp cinnamon

Cream butter, then add sugar and mix well.  Add the eggs and beat some more.  Add dry ingredients and blend well (you can sift the dry ingredients together first, but I never have).  Chill dough.  Roll into balls and then roll in the cinnamon/sugar mixture.  Place on ungreased cookie sheet about 2 inches apart.  Bake at 375 for 8-10 minutes; cool.  Yields 4-5 dozen, depending on size.

These magical snickerdoodles will help you win friends and influence people.
It's a fact.
Enjoy!!!

And Now...A She Said Blooper
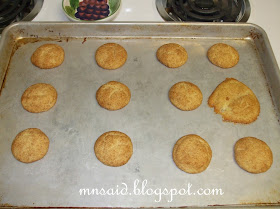
This is the third tray of cookies from my baking excursion this afternoon.  Perfectly-baked snickerdoodles have a cute little domed shape.  You may notice that one of these things is not like the others.

What on Earth?

I had some small chunks of butter that didn't get blended very well, and I think this particular cookie contained one such chunk, resulting in its unusual shape.  It still tasted fine and was definitely good for a laugh! :)
 Photobucket

Sunday, February 12, 2012

Handmade Valentine Cards


Here's a quick Valentine card with a personal touch -- it's cute and takes just a few minutes to construct!!

Here's what you'll need:
Cardstock
Computer and printer (optional)
Fabric heart (I used leftovers from this project)
Glue stick
Needle and thread

Using your computer's word-processing program, design and print off the text for your card.  I went the simple route and just chose the word "love" (colored in red), but you can be as elaborate as you want.  If you have super-cute handwriting (which I don't), you can do this part by hand.

Put some glue on the back of your heart, then stick it to the front of your card; this will hold it in place while you sew and prevent you from tearing out your hair in frustration.

Using your needle and thread, do a simple stitch around the heart.  Extra bonus: use a pushpin to poke holes around the perimeter of your fabric heart beforehand to create a template for sewing.  I didn't do this, but it would have been easier to sew if I had.


Add a personal note inside your card, then find an envelope that fits and send your card to a special someone.


Easy as pie!!

 Photobucket

Wednesday, February 8, 2012

Guest Posting at FloralShowers!


We were so excited and flattered when our awesome friend Anne asked us to guest post on her craft blog, FloralShowers!!  We've put together a great Valentine gift idea (at least we think so!) for the manly man in your life.  Hop over to check out our post and spend some time perusing Anne's site as well!


Thanks for hosting us, Anne!!  We love ya! :)

  Photobucket

Saturday, February 4, 2012

For the love of nailpolish


You know how much I love nail polish!! L.O.V.E. it (are you listening OPI?) So when I saw these great Ombre nails on Pinterest I had to try it out. I thought it would be perfect for Valentines. There are two ways to achieve these Ombre nails.

1. Take all of your nail polishes and organize them by color. You want to arrange a color palette that goes from dark to light. If you have enough nail polishes to do that - you got it! Paint each nail one of the shades going in order from light to dark....or dark to light, it's up to you.

2. For a more "true" ombre effect I followed this tutorial from Pretty Young Thingz and I really like the results!
You will need:
Your nail polish color that you want
Some white nail polish (I grabbed a white/creamy/glittery one) - you will use this to lighted the color as you go
a Paper plate
Toothpicks
Good Move/TV show (I did this while I watched Downton Abbey....highly recommend!)

1. Clean off the nail polish brush with nail polish remover
2. Brush your thumbs with your chosen color ** normally when I paint my nails I do one hand and then the other. Since you will be creating lighter shades as you go it easiest to paint both hands at the same time**
3. Put some of that color on a paper plate and put a drop or two of the white polish. Mix together with a toothpick and you now have a lighter shade to put on the the pointer fingers.
4. Then put another two drops into the nail polish on the plate and mix with a tooth pick. Now you have an even lighter shade that goes on the next nail. Repeat this step for the rest of the nails. Adding a drop or two of the white to your nail polish color on the plate creating a lighter color as you go until you reach your pinkie.
5. When you are finished let dry & finish with a top coat.


There you go. Awesome looking nails and a pretty easy process to do it.


I don't know about you, but I am on the hunt for a really good top coat polish something that has some staying power, but doesn't need 100% Acetone to take it off (i.e. those gel top coats that are floating around) if you know of one shoot it my way. 

Photobucket

Wednesday, February 1, 2012

Valentine Crafting — A Heartwarming (And Hand-Warming!) Gift

It's February, which means that Valentine's Day will be here before you know it!  These little rice-filled hand warmers are a quick and thoughtful gift to brighten the day of your sweetheart in a cold climate.  There are tons of tutorials online for making these, but this is how I made mine.


These don't take much fabric at all; I made mine from some scraps of leftover material from a Christmas project.  I used regular cotton fabric, but flannel would be dreamy, too.
 
Start by making your heart pattern.  You can print off a heart shape from your computer, or you can go old-school and make your own; to keep the heart symmetrical, fold your paper in half, then cut out the heart.  Be sure to account for seam allowances and adjust your pattern accordingly so that your finished product is the size you want.  (Here's an smart tip for adding seam allowances!)  I made my pattern from a Papa Murphy's Pizza flyer because it was handy. :)


You will need two hearts for each hand warmer and four hearts if you're making a set.

Place two hearts right sides together and sew, leaving a 1-inch opening for turning and stuffing.  I would recommend having your opening along a straight side edge.  When I made mine, I left the bottom open, which made sewing the point of the heart kind of tricky.

Trim your seams, clip your curves, and turn the heart right-side out.  If you need to, use a pencil (or one of your husband's fancy chopsticks, if you're me) to help poke the fabric through.  You can also use a knitting needle, but be careful not to jab it through your fabric and make a big hole.

Once your heart is turned right-side out, fill it with rice.  I used the regular ol' long grain stuff.  You may need to use a funnel or some rolled up paper to help you fill it.  You don't want it too full, just under halfway.  I used a little over 1/8 cup of rice to fill this one.


After filling, stitch your opening closed.  There you have it!  A lovely, Valentiney hand warmer to give away or keep for your own cold fingers.  Make another one (or fifteen if you have a lot of friends) so that the recipient can have one for each hand.

To use, pop your hand warmers in the microwave for a minute and then see how they feel.  If needed, nuke them a little longer.  You want them warm enough to be soothing but not hot enough to inflict burns.

These are pretty quick to whip up and if you make them assembly-line style, you will have a bunch of cute hand warmers for all of your Valentines in no time!!


 Photobucket