Last summer our church had a craft Saturday, and I signed up for the zipper flower class. I ended up arriving late and not having enough time before my next class, so I didn't even finish one. I brought all of my materials home and committed to finishing them that afternoon.
Ten months later, I finally completed them. :)
Isn't that just the way it goes sometimes?
I thought my little zipper flowers turned out so cute -- and they're really easy, too! To make your own zipper flower, here's what you'll need:
 |
| Do you like how my glue gun is the same color as my zipper? |
We're going to make the petals first. Take one of the 4" pieces of zipper and cut yourself a piece of thread that's at least twice as long as the zipper. Knot the end of your thread, then hand sew a long basting stitch at the bottom of the zipper. This does not have to be perfect!
When you get to the end of your zipper, leave your needle threaded and do not knot the thread. Pull on the end of the thread. This will cause the zipper to gather and begin to form a petal shape, like this:
Pull tightly, then use your needle (which is still threaded, remember?) to tack the two ends of the zipper together, like so:
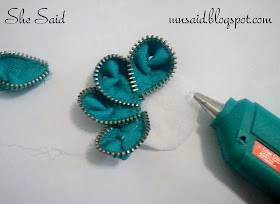
Voila! You have a petal. Repeat with your remaining short pieces, then glue onto your felt.
 |
| Just eyeball it. Nothing here has to be perfect! Imperfections give it character. |
Repeat the process with your long piece of zipper, coiling it as tightly as you want for the center. You can use a piece as long as you want for this, really, but I found the 8" worked best for me. Glue this in the center of your flower and then add beads, little pearls, or whatever embellishments you want.
And there you have it! Find a variety of zippers and make yourself a whole garden of zipper flowers. I glued barrettes to the backs of two of my flowers and turned them into hair accessories; I glued a safety pin on the back of the third and have it pinned to my purse. :)


No comments:
Post a Comment