Showing posts with label Tutorial. Show all posts

Wednesday, September 19, 2012

1 Ugly Painting 2 Cute Crafts : Canvas Sign


Remember this little bad boy I got a yard sale? Remember Part One of our transformations? Are you ready for part 2?
Well, grab that canvas & lets start making our:


Along with your canvas you will need:
Sandpaper
Scrapbook paper (5-8 12x12 sheets)
Vinyl Letters
 (I have a Silhouette cutter that I cut my letters with, but you can buy vinyl letters in any craft store)
Mod Podge
Sponge brush
Black Spray Paint

 
Here is our canvas! You want to sand down all of those leafy trees & happy clouds so the canvas has a smooth{er} surface. No need to sand the picture away because you are going to cover it anyways.
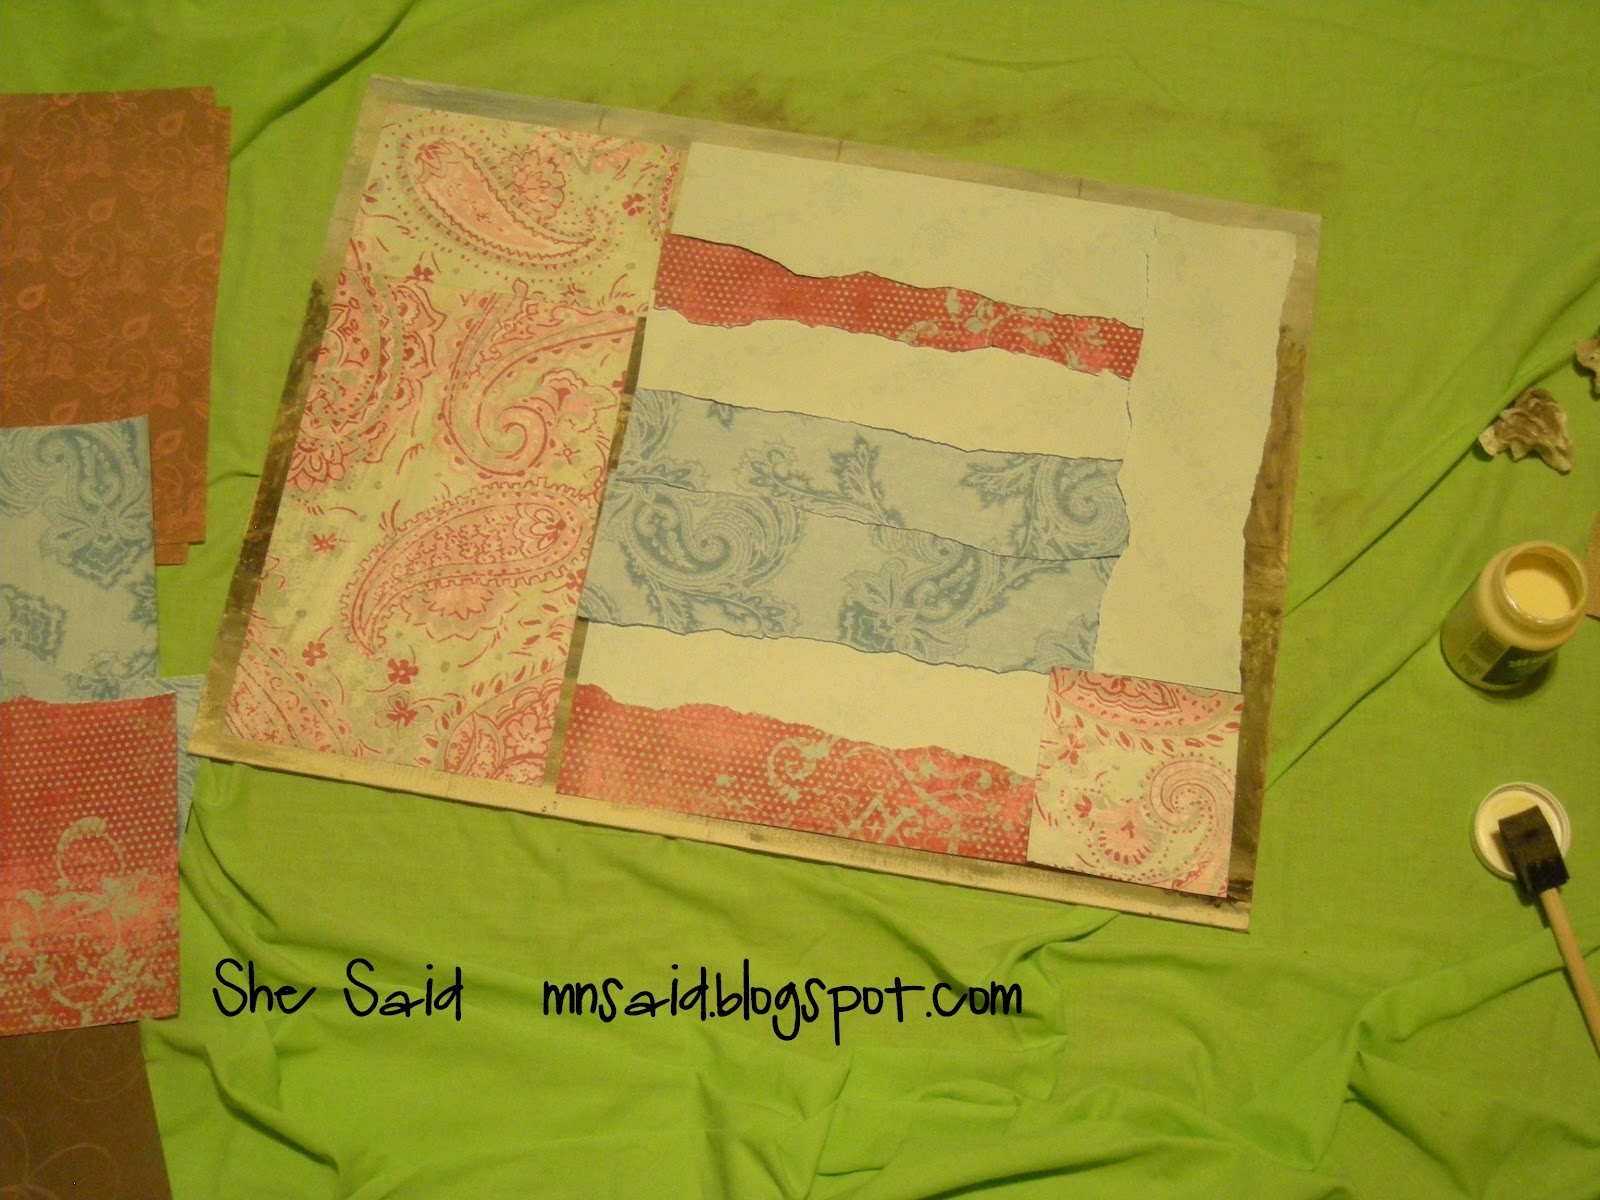
 
Once sanded you will apply your scrapbook paper to the canvas. Put a thin layer of mod podge on the back of the paper to make it stick and then brush mod podge over the top to seal it to the canvas. Now here is where you are going to let your creative juices flow. I wanted a bright/hippie-ish vibe with mine so I stuck with a color theme & chose a few different patterned papers. I ripped those papers and layered them over each other {with the exception of the top & a slight crack that got left open, but it worked out just fine, so ...I'm just going to say that I planned it that way} I used a Mod Podge with an antique finish on it because I wanted to add a bit of shabby-chic/vintage with my bright/hippie look.
{TIP}If you want an antique look, but don't want to buy antique mod podge? Coffee stain it. Get an old cup of strong coffee and after you have applied your scrapbook paper paint on the old coffee to the degree of brownness {is that even a word?} you want.
{TIP} I would suggest that you cover the entire canvas with scrapbook paper. It was late at night for me and I had limited coordinating papers to work with so I left a boarder of canvas around my paper. Cover it all, don't leave a boarder. I will point out why later on in the post.

 
Measure your canvas & figure out how large you want your letters. I wanted "home" to be the biggest and "you" to be the next. Pull out the ruler & start making notes. If you are like me, you want to get it right the first time!
{TIP} I cut pieces of scrap paper to the size that I want to make sure everything will fit when gauging how large letters should be. You don't have to cut each and every letter. Squares in the sizes that you want work out fine for figuring out spacing & room.
{TIP} Use vinyl that you don't want/like/need anymore/mismatched colors/on sale - you will see why later on.
 
Apply your vinyl letters
 
{TIP} I like to apply letters or words starting with the top and then doing the bottom, leaving the middle for last. I find that helps me with my spacing. Same thing for the letters in the words. When applying the "YOU" I did the O first so I could use the space wisely with the Y & U.


Now you have your sign and as you can see I ran out of vinyl & had to use some other pieces I had on hand. It really doesn't matter because once you have it on a tarp or drop cloth you will......
 
Spray paint the whole thing black. Yep. Cover that baby up with black, black, black. I wish I had taken a picture of Mr. S when I told him I was taking it out to spray paint it! He didn't know what I was doing, but I'll show you the method to my madness
{TIP} Do this step at night. That way you can let it dry and air out for a nice long time instead of anxiously testing it to see if it's still tacky. Spray it. Sleep and wake up to a nice, dry & less stinky canvas in the morning. Be sure to keep it away from timed sprinklers, neighborhood cats & trees that are dropping leaves.

In the morning bring it in and start peeling that vinyl off {you use and throw away alot of vinyl in this project} Do you see the awesomeness underneath??
I'm really happy with the two triple toned effect I got by layering papers and accidentally leaving a gap for the original painting to show through. I don't even mind the spray paint that eeked underneath the letter. It gives it that vintage/hippie/shabby chic effect that I wanted.
Please note: by leaving the canvas border and even doing multiple layers of paper will make your canvas uneven when looked at up close...do you see it. So cover your entire canvas and if you are using multiple papers be aware it won't be even, but still look uniform with that black paint.
And when you peel it all off you are left with this......

 Your canvas sign! Love it! Cherish it! Show it off to everybody that comes to your house! I'm debating on how to hang it. Part of me wants to use those tacky wall cling things so it's just mod and hanging there. Another part of me wants to attach ribbon and hang it with that - any input would be most appreciated.

 
So happy to share this with you and I would be excited to see if any of you do it!
If you make a sign PLEASE brag about it and post it on our She Said Facebook wall so I can smother you with compliments!
 
Missed out on Part 1 of our Ugly Painting remodel? Check out what I did with frame HERE


Photobucket

Tuesday, June 12, 2012

Springtime Showers Bring...Zipper Flowers! *Tutorial*


Last summer our church had a craft Saturday, and I signed up for the zipper flower class.  I ended up arriving late and not having enough time before my next class, so I didn't even finish one.  I brought all of my materials home and committed to finishing them that afternoon.

Ten months later, I finally completed them. :)
Isn't that just the way it goes sometimes?

I thought my little zipper flowers turned out so cute -- and they're really easy, too!  To make your own zipper flower, here's what you'll need:
Do you like how my glue gun is the same color as my zipper?
We're going to make the petals first.  Take one of the 4" pieces of zipper and cut yourself a piece of thread that's at least twice as long as the zipper.  Knot the end of your thread, then hand sew a long basting stitch at the bottom of the zipper.  This does not have to be perfect!

When you get to the end of your zipper, leave your needle threaded and do not knot the thread.  Pull on the end of the thread.  This will cause the zipper to gather and begin to form a petal shape, like this:

Pull tightly, then use your needle (which is still threaded, remember?) to tack the two ends of the zipper together, like so:

Voila!  You have a petal.  Repeat with your remaining short pieces, then glue onto your felt.
Just eyeball it.  Nothing here has to be perfect!  Imperfections give it character.

Repeat the process with your long piece of zipper, coiling it as tightly as you want for the center.  You can use a piece as long as you want for this, really, but I found the 8" worked best for me.  Glue this in the center of your flower and then add beads, little pearls, or whatever embellishments you want.

And there you have it!  Find a variety of zippers and make yourself a whole garden of zipper flowers.  I glued barrettes to the backs of two of my flowers and turned them into hair accessories; I glued a safety pin on the back of the third and have it pinned to my purse. :)

Photobucket

Wednesday, May 9, 2012

Pin-Spired and Personalized Baby Gifts

One of my good friends recently gave birth to adorable twins, a boy and a girl.  I debated about what to give as a baby gift and did some searching on Pinterest for ideas, and this hooded bath towel tutorial from Prudent Baby made up my mind for me.  The tutorial was easy to follow and the towels were quick to make.  They turned out even cuter than I'd anticipated:


I decided to personalize the towels and added each baby's first initial to the back of the towel.  I won't take the time to give you a tutorial for the towels themselves, since the Prudent Baby tutorial is excellent, but I'll quickly explain how I made the initial.

Start out by ironing some fusible interfacing to the back of your fabric; I used the same fabric that I used for the decorative band on the hood.  I used a medium-weight interfacing.  You want something heavy enough to give the fabric some stability, but not something so heavy that it makes the letter super stiff.  Next, find a font that you like and enlarge the letter to the size you want.  I did this in Word and made the letter as large as it could get while still fitting on one page.  To save ink, I printed it as an outline, rather than a solid letter.  Pin your letter to your stabilized fabric and cut it out, then pin it to your towel and sew around the entire perimeter of the letter.  You can use a zig-zag stitch if you want, but I just straight-stitched  as close to the edge as I dared, then washed the towels and trimmed any ragged strings.


I had a lot of fun making these towels (other than when I broke a sewing machine needle and then put the replacement needle in backwards...), and I hope babies L and V love using them!

Photobucket

Wednesday, February 1, 2012

Valentine Crafting — A Heartwarming (And Hand-Warming!) Gift

It's February, which means that Valentine's Day will be here before you know it!  These little rice-filled hand warmers are a quick and thoughtful gift to brighten the day of your sweetheart in a cold climate.  There are tons of tutorials online for making these, but this is how I made mine.


These don't take much fabric at all; I made mine from some scraps of leftover material from a Christmas project.  I used regular cotton fabric, but flannel would be dreamy, too.
 
Start by making your heart pattern.  You can print off a heart shape from your computer, or you can go old-school and make your own; to keep the heart symmetrical, fold your paper in half, then cut out the heart.  Be sure to account for seam allowances and adjust your pattern accordingly so that your finished product is the size you want.  (Here's an smart tip for adding seam allowances!)  I made my pattern from a Papa Murphy's Pizza flyer because it was handy. :)


You will need two hearts for each hand warmer and four hearts if you're making a set.

Place two hearts right sides together and sew, leaving a 1-inch opening for turning and stuffing.  I would recommend having your opening along a straight side edge.  When I made mine, I left the bottom open, which made sewing the point of the heart kind of tricky.

Trim your seams, clip your curves, and turn the heart right-side out.  If you need to, use a pencil (or one of your husband's fancy chopsticks, if you're me) to help poke the fabric through.  You can also use a knitting needle, but be careful not to jab it through your fabric and make a big hole.

Once your heart is turned right-side out, fill it with rice.  I used the regular ol' long grain stuff.  You may need to use a funnel or some rolled up paper to help you fill it.  You don't want it too full, just under halfway.  I used a little over 1/8 cup of rice to fill this one.


After filling, stitch your opening closed.  There you have it!  A lovely, Valentiney hand warmer to give away or keep for your own cold fingers.  Make another one (or fifteen if you have a lot of friends) so that the recipient can have one for each hand.

To use, pop your hand warmers in the microwave for a minute and then see how they feel.  If needed, nuke them a little longer.  You want them warm enough to be soothing but not hot enough to inflict burns.

These are pretty quick to whip up and if you make them assembly-line style, you will have a bunch of cute hand warmers for all of your Valentines in no time!!


 Photobucket
Related Posts Plugin for WordPress, Blogger...
 

Template by Best Web Hosting