Sunday, December 2, 2012

Like Christmas In a Cup


Steamers! Hot Chocolate's overlooked cousin. I love steamers. Also called "Hot Cows", a steamer is a hot drink of steamed milk with a flavoring of your choosing. Last winter the local coffee hut made bank on me and my adoration for this creamy, warm, seasonal drink. I thought that making my own steamer was impossible without an espresso machine and it's steaming wand. After a few google searches and articles on foam for cappuccino....the possibility of making steamers at home without an expensive Italian machine was made possible. Enjoy!

 
Put a cup of milk in a jar that has a lid, like a mason jar. You want the milk cold and you don't want to fill the jar up to the top. You need room in there to shake it.

 
Shake the jar for 30-45 seconds to get some nice foamy bubbles. Look at the picture, do you see the foam layer & the milk layer....that is what you want! Take off the lid & microwave the milk for 2 minutes or less {if you don't like it as hot as I do}

 
Pour the milk into the mug holding back the foam with a spoon {I like foam so I just pour it all in}.
 Dispense the flavored syrup of your choice. I really like Toranio syrups. They come in a gazillion flavors. They can be a bit spendy. I would suggest Cash & Carry and World Market for a good selection at a good price.
You don't want to over do the syrup. A little goes a long way. I would put in a teaspoon at first and add a little more to taste. If you have one of those blue toppers {what is the technical term for that anyways?} "draw" two circles in your cup.

 
I added a bit of pumpkin pie spice to the top or cinnamon would be yummy too. I was going for a pumpkin pie cupcake flavor - delish!!
Enjoy!!!


Hint: Wash out the milk jar immediately. It's alot easier to clean!!!


Photobucket

Thursday, November 15, 2012

"Get It Done Already" Party!

We hope you've been inspired by our Get It Done Already! series.  We've both enjoyed crossing a few more things off of crafting to-do lists.  In case you've forgotten...

Nancy used autumn leaves to create some festive throw pillows, place mats, and a garland.


Michelle repurposed a cabinet door to make some sweet nursery wall art and also created this fabulous wall organizer.


And now it's YOUR turn to show off your own "Get It Done Already!" projects!

Originally, we wanted to do a linky party to share your projects, but we've had some technical difficulties setting it up.  So if you want to show off your "Get It Done Already" accomplishments, leave a link to your blog post in the comments or shoot us an email (with pictures, please!) at shesaidblog@yahoo.com.  All submitted projects (except for spam, of course) will be featured in a blog post after Thanksgiving.

We can't wait to see what you've been up to!

Photobucket

Friday, November 2, 2012

Wall Organizer {Get it Done Already!}


I apologize for the tardiness of this post. Between being out of town & Halloween this week has just flown by! I wanted to share with you a project that I worked on.

 
How many of you have counters like this? Yeah that's totally mine. Papers, mail, boxes...."organized piles" I like to call it. I know where everything is it just so happens to share one space with everything else. Mr S was sick of the clutter and I was too. Something had to be done & that is where my wall organizer idea was born. I really liked the ones at Pottery Barn, but it was just too spendy. So I put on my repurposing hat and used things around the house.

 
I started out with a curtain rod & collected my organizing items. There were quite a few ideas I saw on pinterest of wall organizers. I settled on my magnet board, calendar frame & mail bins {I'll tell you what I used in a minute}

 
I used screw eyes & shower curtain loops to attach my organizing items to the rod

For my mail bins I spray painted some old bread pans that I had. They were rusty & couldn't be used for bread making anymore. I nice shiny black spray paint job made them shiny & new. I wanted them "stacked" on top of each other. Drilling two holes on the handles of the pans I ran I had Mr. S string galvanized wire through, leaving loops at the top.

 
Then I pulled out the Silhouette & cut some numbers for the bins. You can easily use the number stickers/vinyl that is at your scrapbook store.


Strung my organizers onto the rod and there you go! My very own, custom, wall organizer.
I would caution you on the weight you put on the curtain rod, it can only hold so much.


So glad that it's done already!!
 
We hope that you have enjoyed our Get It Done series & hope that it has inspired you to get it done already.
Got some things done?
 Next week {November 11th} Nan will kick off our Get It Done Already Linky Party Get those pictures & posts ready to show off  YOUR Get It Done Already crafts!
Photobucket

Wednesday, October 24, 2012

Fall Leaf Decor (Get It Done Already!)

We hope you've been enjoying our Get It Done Already! series.  It is so nice to finish a project that has been waiting for a looooong time. :)

I finished up two projects this week, both of them autumn-related.  The first one is this leaf garland:


I bought a package of artificial fall leaves from the Dollar Store....oh....about four years ago (yikes!).  I used some of the leaves right away, but the majority of the leaves remained in the package, stored away for "someday".  After seeing this beautiful leaf garland from Running With Scissors, I decided how to use those artificial leaves!  (She used real leaves and has instructions for preserving them on her blog post, if you're interested.) The garland is really easy and fast to make.  All you do is sew your leaves together in one long strip, overlapping them slightly as you sew.  I didn't try to plan out a pattern with the colors or anything, I just sewed them in the order I picked them up.  It took me about fifteen minutes to make; it would have taken much less time, but my bobbin ran out of thread and then my main spool of thread ran out, too!  I love how cheery it looks on my fireplace — a big impact for a little effort!

My next project uses the same fabric I used for my fall pillow covers:


These autumn leaf place mats were a cinch to make! I used two pieces of fabric plus some thin batting for each place mat.  I traced around an existing place mat for my template, adding 1/2 inch seam allowances on all sides.  After I pinned my fabric right sides together and put the batting on top, I stitched around the outside, leaving about 4 inches for turning.  I clipped the corners, turned the place mats right-side out, and pressed them.  The final step was to add two rows of top-stitching around the perimeter of the place mats (one inside the other, like a frame), and in the process I sewed closed the opening I'd left for turning.  Now that fabric is completely used up, and our kitchen table looks much more festive!

What projects have you been getting done recently?

Photobucket

Sunday, October 14, 2012

Nursery Wall Art {Get it Done Already}

 
I'm hoping that Nan has inspired you all to Get it Done Already with those cute throw pillows. I was actually at a Walmart over the weekend and spied some similar fabric that she used for those pillows and then had to remind myself that I already have a looooong list of things I need to get done!
Top of my list: Nursery Wall Art
 
I've had a sign similar to this one pinned on my "Must Craft Soon" board for a long time now. This last summer I made strides by getting my hands on a uber cheap cabinet door and thought, "this is what I will use for my sign." Then the door sat. And sat. I got a cute shade of teal paint. And it sat. And sat.

 
Then the gal I borrowed the paint from needed it back {I'd had it since December} So I painted it really quick and as it sat drying I realized I needed some more supplies to finish the project and so it sat....and sat.

 
A few months {yep months} later I got the supplies that wanted and moved foreword with the lettering. I used the trusty Silhouette to cut out my letters. Goodness I love that thing! I'm one of those crafters that needs to get it done right the first time or I don't do it at all. Be sure to measure your board to figure out height & spacing of the letters. I also like to use scrap pieces of paper to get a little closer to those measurements and lay it out before I move forward with cutting.

 
After cutting out my letters {keep the stencil part of the paper!!!!} I created the layout like I wanted it.

 
Then I stenciled {see you are going to use that paper} the letters on with a pencil....can you see it or is it too faint?
 
 
Then ....and this the BIG secret to perfect hand lettering. Get a paint pen and retrace the stencil. The paint pen creates a great outline. Be sure to test it out on a piece of paper before writing on the actual sign. After it's dry take your paint & a small brush and fill in the letters.
After I did this the sign was well...technically finished, but I was contemplating ageing it to make it look vintage and then I thought maybe I should create some kind of a knot to place through those two holes on the bottom {where the handle used to be} the sign then....yep you guessed it....sat for a few more months while I tried to decide what to do.
I guess this post could be re-labeled as "Get it Hung Up Already" because after weighing my options to age or not to age {which if you are going to age a sign you need to have that in mind before you even paint - if you want it done right} and realizing that I could be making a perfectly cute sign ugly {you can't go back after you age a piece.} I decided to leave it be and hang it up.

 
So there you go. After months and months it's done and up and I love it!
Do you have a craft that needs to get done? Get it Done Already and join us at the end of the series for a linky party where you can show it off!!

Photobucket

Monday, October 8, 2012

Get It Done Already!

Before we get started, we need to announce the winner of our giveaway!  The lucky winner of a pair of ear pins is Anne!  Congratulations, Annie!!

I don't know about you, but autumn always makes me want to craft.  Visions of Halloween decor, Thanksgiving centerpieces, and handmade Christmas gifts dance in my head.  I collect coupons for Joann's, Michael's, and Hobby Lobby, dreaming of all the wonderful things I can make.  Except....

I have about a zillion unfinished projects at home.

I have yarn for crochet projects that I haven't started.  I have fabric that hasn't been cut.  And I have a half dozen other projects that were started but haven't yet been finished.  Raise your hand if you can relate.

In an effort to finish up some of these orphaned works in progress, we are launching a series entitled
Get It Done Already!
We'll each take some turns finishing up some of these projects and them sharing them with you, our readers. Please feel free to play along!  At the end of the series, we'll do a linky party so that you can share what you've been able to finish.  So let's wrap up some of these crafts and free up our homes and time for the holiday projects we want!!

First up, these fall pillows:


TWO YEARS ago, I found this great tablecloth on clearance at Walmart for $5.  I thought it would be perfect for some fall-themed throw pillows for our couches.  I bought it, brought it home, and did nothing with it.  That's right.  The next fall, I packed it up and moved it to Texas.  And then did nothing with it.  I pulled it out again last week and decided enough was enough!  I used my existing pillows and just made simple envelope covers for them.  I didn't write a tutorial, but Six Sisters' Stuff has great directions.

A couple of hours later I had these cute pillows.


I can't tell you how good it feels to have these completed!  They cheer up our couches and my craft guilt has been lessened considerably.

Now, go forth and
Get It Done Already!

Photobucket

Thursday, September 27, 2012

Giveaway Time!!

UPDATE:
The giveaway has been extended through Saturday, October 6th, at 11:59 PM Pacific.  Details below!

For those of you who don't already know, I recently opened an Etsy shop!  It's something I'd been considering for a little while, and I finally decided to go for it after encouragement from Mr. W and some friends.  I plan to add more items to my shop, but right now I'm only selling ear pins.  And what are ear pins, you ask?  They're earrings which travel up your earlobe, like this:

Not quite sure I should start an ear-modeling career, but you get the idea. :)
These cute little babies are made with my own two hands.  I have a few different styles available and I can make custom orders, too!  You only need one piercing in your ear to wear these.

To celebrate my shop's grand opening, I'm sponsoring a giveaway for our loyal She Said readers!  One of you lucky ducks will get a free pair of the ear pins of your choosing.

Here's how to enter:
*Visit NanBug Shop on Etsy.  Leave a comment on this blog post telling me which ear pin style you like best. (Required)
*Add NanBug Shop to your Etsy favorites.
*Share a link to the shop on your Facebook page.
*Become a follower of She Said.
*Become friends with She Said on Facebook.

Make sure you leave a comment for each one that you do!!!  If you're already a follower or one of our FB friends, just leave us a comment to let us know.

The giveaway starts now and will close at 11:59 PM Pacific Time on Sunday, September 30.
Winner will be announced on the blog on Monday, October 1.
Extended through 11:59 PM Pacific on Saturday, October 6!

Additionally, I am offering a discount code to She Said readers!!  Enter the coupon code SHESAID at checkout to receive free shipping.

If you have any questions about the giveaway or shop items, you can contact me at nanbugshop@gmail.com.

Good luck!!

Photobucket

Wednesday, September 19, 2012

1 Ugly Painting 2 Cute Crafts : Canvas Sign


Remember this little bad boy I got a yard sale? Remember Part One of our transformations? Are you ready for part 2?
Well, grab that canvas & lets start making our:


Along with your canvas you will need:
Sandpaper
Scrapbook paper (5-8 12x12 sheets)
Vinyl Letters
 (I have a Silhouette cutter that I cut my letters with, but you can buy vinyl letters in any craft store)
Mod Podge
Sponge brush
Black Spray Paint

 
Here is our canvas! You want to sand down all of those leafy trees & happy clouds so the canvas has a smooth{er} surface. No need to sand the picture away because you are going to cover it anyways.

 
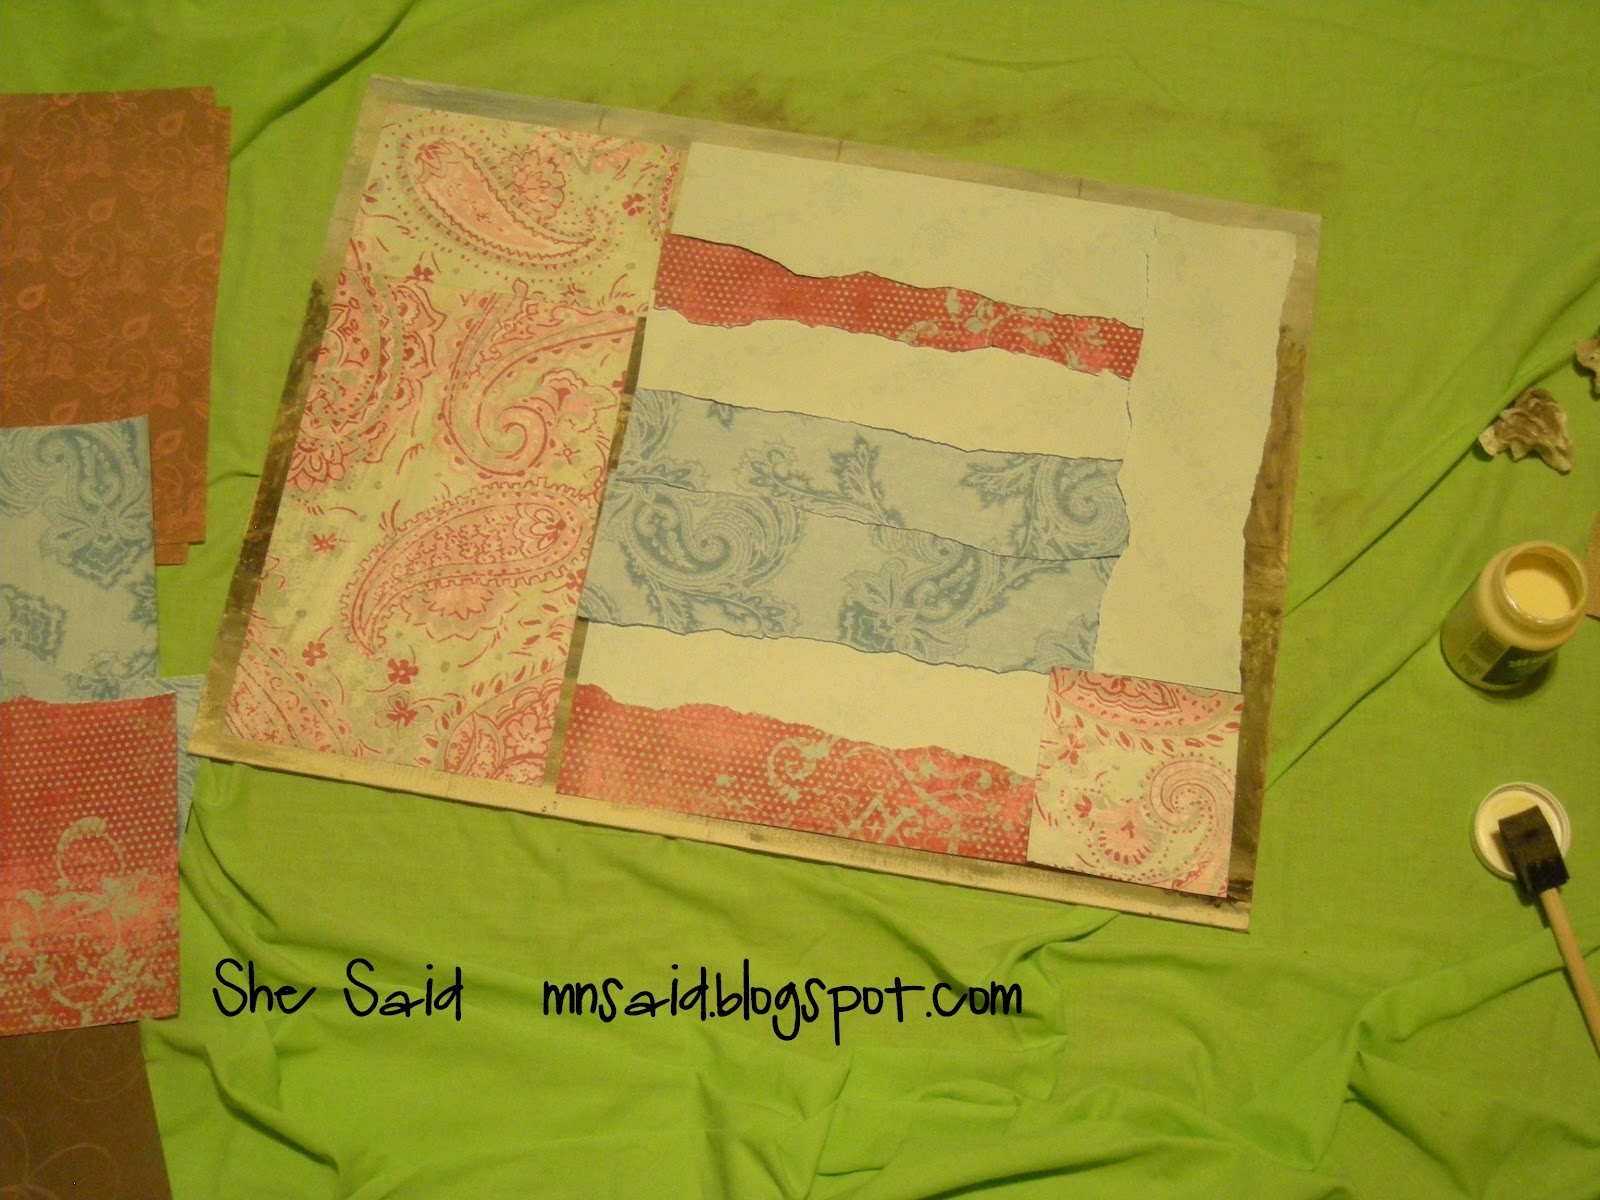
Once sanded you will apply your scrapbook paper to the canvas. Put a thin layer of mod podge on the back of the paper to make it stick and then brush mod podge over the top to seal it to the canvas. Now here is where you are going to let your creative juices flow. I wanted a bright/hippie-ish vibe with mine so I stuck with a color theme & chose a few different patterned papers. I ripped those papers and layered them over each other {with the exception of the top & a slight crack that got left open, but it worked out just fine, so ...I'm just going to say that I planned it that way} I used a Mod Podge with an antique finish on it because I wanted to add a bit of shabby-chic/vintage with my bright/hippie look.
{TIP}If you want an antique look, but don't want to buy antique mod podge? Coffee stain it. Get an old cup of strong coffee and after you have applied your scrapbook paper paint on the old coffee to the degree of brownness {is that even a word?} you want.
{TIP} I would suggest that you cover the entire canvas with scrapbook paper. It was late at night for me and I had limited coordinating papers to work with so I left a boarder of canvas around my paper. Cover it all, don't leave a boarder. I will point out why later on in the post.

 
Measure your canvas & figure out how large you want your letters. I wanted "home" to be the biggest and "you" to be the next. Pull out the ruler & start making notes. If you are like me, you want to get it right the first time!
{TIP} I cut pieces of scrap paper to the size that I want to make sure everything will fit when gauging how large letters should be. You don't have to cut each and every letter. Squares in the sizes that you want work out fine for figuring out spacing & room.
{TIP} Use vinyl that you don't want/like/need anymore/mismatched colors/on sale - you will see why later on.
 
Apply your vinyl letters
 
{TIP} I like to apply letters or words starting with the top and then doing the bottom, leaving the middle for last. I find that helps me with my spacing. Same thing for the letters in the words. When applying the "YOU" I did the O first so I could use the space wisely with the Y & U.


Now you have your sign and as you can see I ran out of vinyl & had to use some other pieces I had on hand. It really doesn't matter because once you have it on a tarp or drop cloth you will......
 
Spray paint the whole thing black. Yep. Cover that baby up with black, black, black. I wish I had taken a picture of Mr. S when I told him I was taking it out to spray paint it! He didn't know what I was doing, but I'll show you the method to my madness
{TIP} Do this step at night. That way you can let it dry and air out for a nice long time instead of anxiously testing it to see if it's still tacky. Spray it. Sleep and wake up to a nice, dry & less stinky canvas in the morning. Be sure to keep it away from timed sprinklers, neighborhood cats & trees that are dropping leaves.

In the morning bring it in and start peeling that vinyl off {you use and throw away alot of vinyl in this project} Do you see the awesomeness underneath??
I'm really happy with the two triple toned effect I got by layering papers and accidentally leaving a gap for the original painting to show through. I don't even mind the spray paint that eeked underneath the letter. It gives it that vintage/hippie/shabby chic effect that I wanted.
Please note: by leaving the canvas border and even doing multiple layers of paper will make your canvas uneven when looked at up close...do you see it. So cover your entire canvas and if you are using multiple papers be aware it won't be even, but still look uniform with that black paint.
And when you peel it all off you are left with this......

 Your canvas sign! Love it! Cherish it! Show it off to everybody that comes to your house! I'm debating on how to hang it. Part of me wants to use those tacky wall cling things so it's just mod and hanging there. Another part of me wants to attach ribbon and hang it with that - any input would be most appreciated.

 
So happy to share this with you and I would be excited to see if any of you do it!
If you make a sign PLEASE brag about it and post it on our She Said Facebook wall so I can smother you with compliments!
 
Missed out on Part 1 of our Ugly Painting remodel? Check out what I did with frame HERE


Photobucket
Related Posts Plugin for WordPress, Blogger...
 

Template by Best Web Hosting