Showing posts with label Crafts. Show all posts

Wednesday, October 24, 2012

Fall Leaf Decor (Get It Done Already!)

We hope you've been enjoying our Get It Done Already! series.  It is so nice to finish a project that has been waiting for a looooong time. :)

I finished up two projects this week, both of them autumn-related.  The first one is this leaf garland:


I bought a package of artificial fall leaves from the Dollar Store....oh....about four years ago (yikes!).  I used some of the leaves right away, but the majority of the leaves remained in the package, stored away for "someday".  After seeing this beautiful leaf garland from Running With Scissors, I decided how to use those artificial leaves!  (She used real leaves and has instructions for preserving them on her blog post, if you're interested.) The garland is really easy and fast to make.  All you do is sew your leaves together in one long strip, overlapping them slightly as you sew.  I didn't try to plan out a pattern with the colors or anything, I just sewed them in the order I picked them up.  It took me about fifteen minutes to make; it would have taken much less time, but my bobbin ran out of thread and then my main spool of thread ran out, too!  I love how cheery it looks on my fireplace — a big impact for a little effort!

My next project uses the same fabric I used for my fall pillow covers:


These autumn leaf place mats were a cinch to make! I used two pieces of fabric plus some thin batting for each place mat.  I traced around an existing place mat for my template, adding 1/2 inch seam allowances on all sides.  After I pinned my fabric right sides together and put the batting on top, I stitched around the outside, leaving about 4 inches for turning.  I clipped the corners, turned the place mats right-side out, and pressed them.  The final step was to add two rows of top-stitching around the perimeter of the place mats (one inside the other, like a frame), and in the process I sewed closed the opening I'd left for turning.  Now that fabric is completely used up, and our kitchen table looks much more festive!

What projects have you been getting done recently?

Photobucket

Monday, October 8, 2012

Get It Done Already!

Before we get started, we need to announce the winner of our giveaway!  The lucky winner of a pair of ear pins is Anne!  Congratulations, Annie!!

I don't know about you, but autumn always makes me want to craft.  Visions of Halloween decor, Thanksgiving centerpieces, and handmade Christmas gifts dance in my head.  I collect coupons for Joann's, Michael's, and Hobby Lobby, dreaming of all the wonderful things I can make.  Except....

I have about a zillion unfinished projects at home.

I have yarn for crochet projects that I haven't started.  I have fabric that hasn't been cut.  And I have a half dozen other projects that were started but haven't yet been finished.  Raise your hand if you can relate.

In an effort to finish up some of these orphaned works in progress, we are launching a series entitled
Get It Done Already!
We'll each take some turns finishing up some of these projects and them sharing them with you, our readers. Please feel free to play along!  At the end of the series, we'll do a linky party so that you can share what you've been able to finish.  So let's wrap up some of these crafts and free up our homes and time for the holiday projects we want!!

First up, these fall pillows:


TWO YEARS ago, I found this great tablecloth on clearance at Walmart for $5.  I thought it would be perfect for some fall-themed throw pillows for our couches.  I bought it, brought it home, and did nothing with it.  That's right.  The next fall, I packed it up and moved it to Texas.  And then did nothing with it.  I pulled it out again last week and decided enough was enough!  I used my existing pillows and just made simple envelope covers for them.  I didn't write a tutorial, but Six Sisters' Stuff has great directions.

A couple of hours later I had these cute pillows.


I can't tell you how good it feels to have these completed!  They cheer up our couches and my craft guilt has been lessened considerably.

Now, go forth and
Get It Done Already!

Photobucket

Wednesday, September 19, 2012

1 Ugly Painting 2 Cute Crafts : Canvas Sign


Remember this little bad boy I got a yard sale? Remember Part One of our transformations? Are you ready for part 2?
Well, grab that canvas & lets start making our:


Along with your canvas you will need:
Sandpaper
Scrapbook paper (5-8 12x12 sheets)
Vinyl Letters
 (I have a Silhouette cutter that I cut my letters with, but you can buy vinyl letters in any craft store)
Mod Podge
Sponge brush
Black Spray Paint

 
Here is our canvas! You want to sand down all of those leafy trees & happy clouds so the canvas has a smooth{er} surface. No need to sand the picture away because you are going to cover it anyways.

 
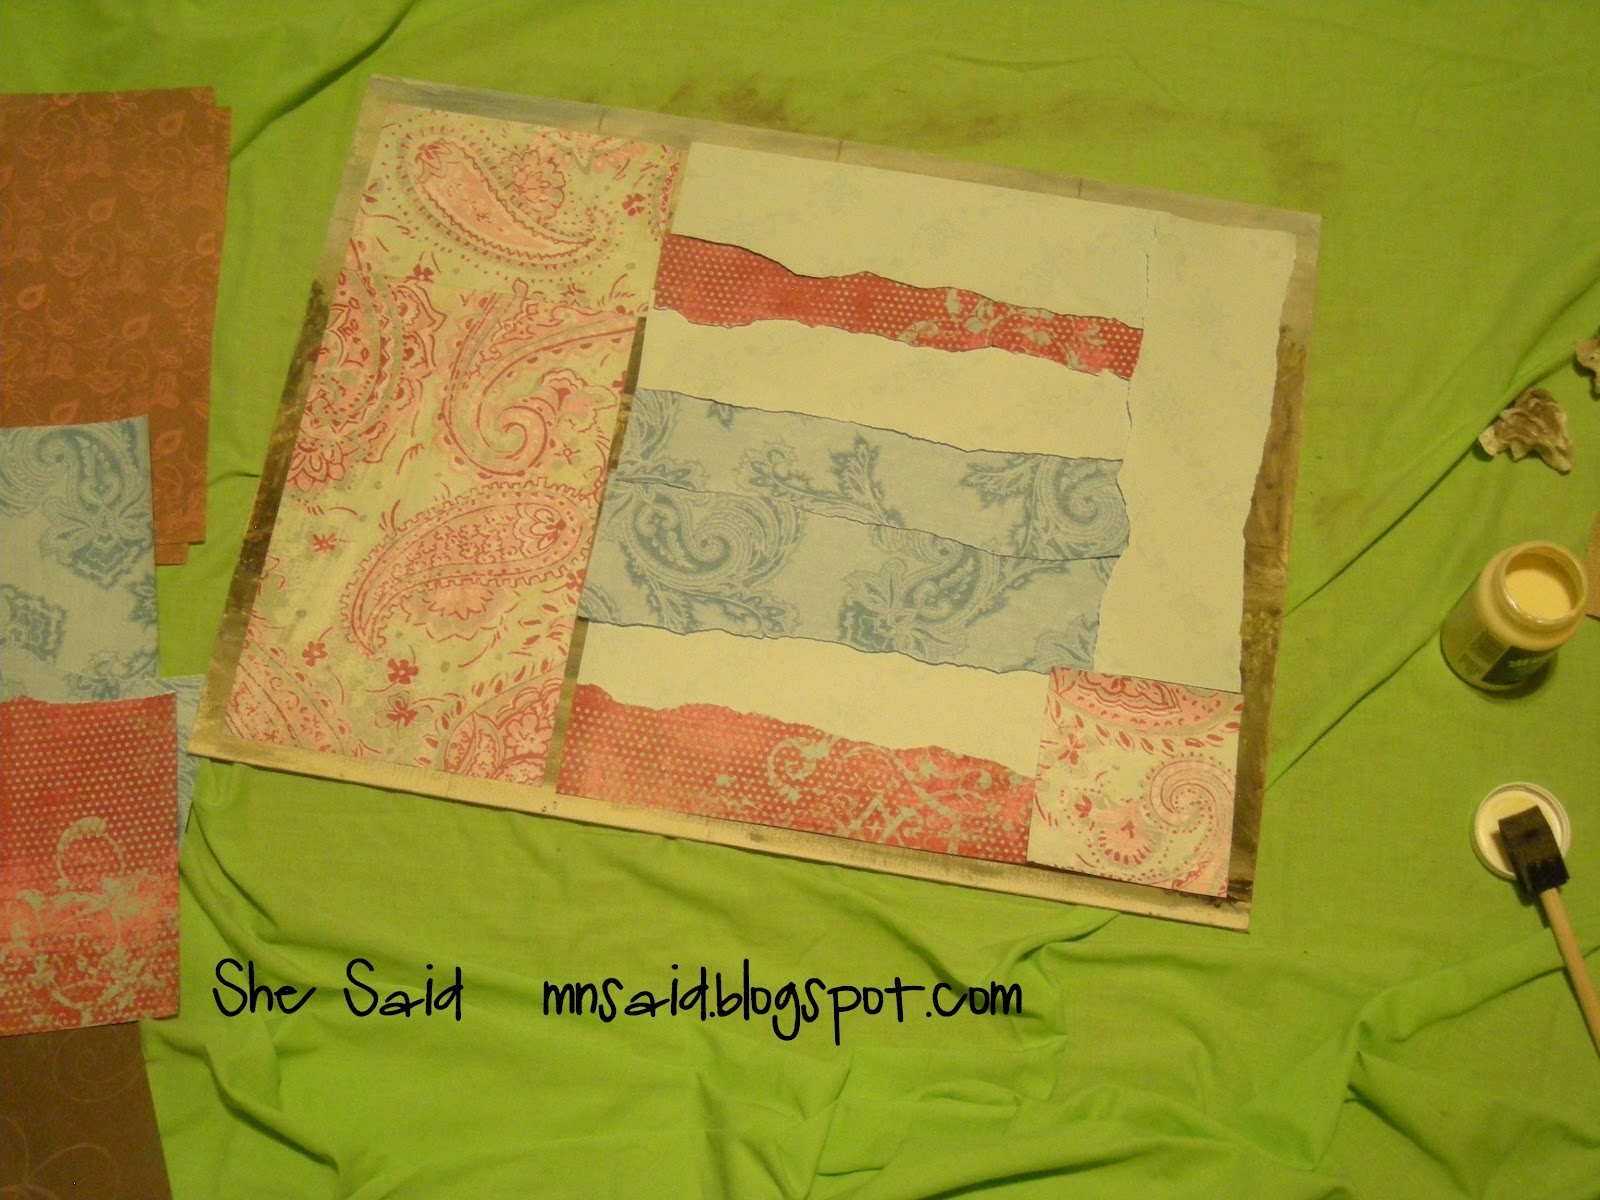
Once sanded you will apply your scrapbook paper to the canvas. Put a thin layer of mod podge on the back of the paper to make it stick and then brush mod podge over the top to seal it to the canvas. Now here is where you are going to let your creative juices flow. I wanted a bright/hippie-ish vibe with mine so I stuck with a color theme & chose a few different patterned papers. I ripped those papers and layered them over each other {with the exception of the top & a slight crack that got left open, but it worked out just fine, so ...I'm just going to say that I planned it that way} I used a Mod Podge with an antique finish on it because I wanted to add a bit of shabby-chic/vintage with my bright/hippie look.
{TIP}If you want an antique look, but don't want to buy antique mod podge? Coffee stain it. Get an old cup of strong coffee and after you have applied your scrapbook paper paint on the old coffee to the degree of brownness {is that even a word?} you want.
{TIP} I would suggest that you cover the entire canvas with scrapbook paper. It was late at night for me and I had limited coordinating papers to work with so I left a boarder of canvas around my paper. Cover it all, don't leave a boarder. I will point out why later on in the post.

 
Measure your canvas & figure out how large you want your letters. I wanted "home" to be the biggest and "you" to be the next. Pull out the ruler & start making notes. If you are like me, you want to get it right the first time!
{TIP} I cut pieces of scrap paper to the size that I want to make sure everything will fit when gauging how large letters should be. You don't have to cut each and every letter. Squares in the sizes that you want work out fine for figuring out spacing & room.
{TIP} Use vinyl that you don't want/like/need anymore/mismatched colors/on sale - you will see why later on.
 
Apply your vinyl letters
 
{TIP} I like to apply letters or words starting with the top and then doing the bottom, leaving the middle for last. I find that helps me with my spacing. Same thing for the letters in the words. When applying the "YOU" I did the O first so I could use the space wisely with the Y & U.


Now you have your sign and as you can see I ran out of vinyl & had to use some other pieces I had on hand. It really doesn't matter because once you have it on a tarp or drop cloth you will......
 
Spray paint the whole thing black. Yep. Cover that baby up with black, black, black. I wish I had taken a picture of Mr. S when I told him I was taking it out to spray paint it! He didn't know what I was doing, but I'll show you the method to my madness
{TIP} Do this step at night. That way you can let it dry and air out for a nice long time instead of anxiously testing it to see if it's still tacky. Spray it. Sleep and wake up to a nice, dry & less stinky canvas in the morning. Be sure to keep it away from timed sprinklers, neighborhood cats & trees that are dropping leaves.

In the morning bring it in and start peeling that vinyl off {you use and throw away alot of vinyl in this project} Do you see the awesomeness underneath??
I'm really happy with the two triple toned effect I got by layering papers and accidentally leaving a gap for the original painting to show through. I don't even mind the spray paint that eeked underneath the letter. It gives it that vintage/hippie/shabby chic effect that I wanted.
Please note: by leaving the canvas border and even doing multiple layers of paper will make your canvas uneven when looked at up close...do you see it. So cover your entire canvas and if you are using multiple papers be aware it won't be even, but still look uniform with that black paint.
And when you peel it all off you are left with this......

 Your canvas sign! Love it! Cherish it! Show it off to everybody that comes to your house! I'm debating on how to hang it. Part of me wants to use those tacky wall cling things so it's just mod and hanging there. Another part of me wants to attach ribbon and hang it with that - any input would be most appreciated.

 
So happy to share this with you and I would be excited to see if any of you do it!
If you make a sign PLEASE brag about it and post it on our She Said Facebook wall so I can smother you with compliments!
 
Missed out on Part 1 of our Ugly Painting remodel? Check out what I did with frame HERE


Photobucket

Tuesday, September 11, 2012

1 Ugly Painting 2 Cute Crafts : Memo Board


Welcome to our two-part series! Where we take this awesome piece of outdated beauty and turn it into something new....and pretty....and updated....

 
This isn't the actual picture of the painting, but it's pretty close & gives you the idea of what I saw at a yard sale earlier this summer. I snatched it up for a $1 and went home and pried it apart. I will be trading in this 1980's-esque painting and turning it into 2...that's right two! Cute crafts I will be happy to have hanging on my walls. Let's begin with.....
 
You will need:
Scissors
Hammer
Needle nosed Pliers
Staple Gun
Twine
cute Paint
paint brush
Sandpaper
 
Turn the painting over & remove any paper backing it might have {mine didn't have any, but more professional paintings do}. Remove the canvas...be careful because you will be using this later. To get my canvas out I had to take my needle nose pliers and pull out the little nails that held the canvas in. Once the canvas is out and placed in a safe place, behold your frame!!

 
Sand down your frames finish. I'm a very impatient person and hate sanding, but have yet to go to the supply store and buy that primer stuff, so ....sand it down. Paint your frame whatever sweet color your choose & let dry.

 
Once the frame is dry turn it face down {be sure there is something under it so the paint doesn't scratch} and grab your staple gun, twine & hammer. Take the end of the twine and staple it to your starting point at the bottom {or top} corner of your frame. Keeping it tight go back and forth from one end of the frame to the other with the twine creating a zig zag pattern, stapling your twine at each end of the frame. It is important that the twine stays tight {think guitar strings} so it can hold up a picture clipped to it. For me the staples didn't hold the twine down enough. I pulled out the hammer and after I would staple the twine in place I would hammer down the staple securing the twine down against the frame.

 
Turn it over & hang it up {I chose to keep the original wire hanger}. Add a few pictures clipped with clothes pins and you are ready to go!


I've seen some people add rolled fabric flowers to the corners which I think is adorable, but this is in the kitchen and I knew Mr. S wouldn't be as excited about the cuteness as I would so I just left mine mod & plain.


It now is home to Baby S's artwork, photographs & baby announcements . I love it!! I hope you do too. Another bonus on this craft is that it is easily done in an afternoon {as long as you are painting with acrylic paint!}.

Stay tuned for Part 2 and see what I do with the canvas!!


Photobucket

Tuesday, June 12, 2012

Springtime Showers Bring...Zipper Flowers! *Tutorial*


Last summer our church had a craft Saturday, and I signed up for the zipper flower class.  I ended up arriving late and not having enough time before my next class, so I didn't even finish one.  I brought all of my materials home and committed to finishing them that afternoon.

Ten months later, I finally completed them. :)
Isn't that just the way it goes sometimes?

I thought my little zipper flowers turned out so cute -- and they're really easy, too!  To make your own zipper flower, here's what you'll need:
Do you like how my glue gun is the same color as my zipper?
We're going to make the petals first.  Take one of the 4" pieces of zipper and cut yourself a piece of thread that's at least twice as long as the zipper.  Knot the end of your thread, then hand sew a long basting stitch at the bottom of the zipper.  This does not have to be perfect!

When you get to the end of your zipper, leave your needle threaded and do not knot the thread.  Pull on the end of the thread.  This will cause the zipper to gather and begin to form a petal shape, like this:

Pull tightly, then use your needle (which is still threaded, remember?) to tack the two ends of the zipper together, like so:

Voila!  You have a petal.  Repeat with your remaining short pieces, then glue onto your felt.
Just eyeball it.  Nothing here has to be perfect!  Imperfections give it character.

Repeat the process with your long piece of zipper, coiling it as tightly as you want for the center.  You can use a piece as long as you want for this, really, but I found the 8" worked best for me.  Glue this in the center of your flower and then add beads, little pearls, or whatever embellishments you want.

And there you have it!  Find a variety of zippers and make yourself a whole garden of zipper flowers.  I glued barrettes to the backs of two of my flowers and turned them into hair accessories; I glued a safety pin on the back of the third and have it pinned to my purse. :)

Photobucket

Friday, May 25, 2012

Can you feel the love tonight?

There is something about rainy days that bring out the crafting bug in me. It is cold, wet & dreary outside but inside it can be warm, happy & crafty! So today, this rainy, wet day - I share with you a craft...a fun {slightly naughty}craft.

I made this for a dear friend of mine for her bridal shower and since June or "The Month of Marriage" is just around the corner I thought you would enjoy a quick, easy & fun shower gift!

This double sided pillow is easy to make and is great at re-purposing items you have around the house.
"The Honeymoon Pillow"

One side says Tonight
The other side says Not Tonight

Great right? Are you already thinking of who to make one for {maybe it's yourself!} Let's get to it!
You will need:
Pillow to re-cover or pillow form
Fabric {I actually used a large shirt for the pillow pictured. It was the perfect shade of gray & it was very soft} you will need to have enough fabric to cover your pillow.
Sewing Machine
Wax Paper
Silhouette HD (or an exact-o knife)
Iron & Ironing Board
fabric paint & sponge brush

1. Make a simple pillow cover. Place the right sides of the fabric together sewing three sides.
2. Slip the pillow inside of the cover and either hand stitch it closed or -in my case the fabric was stretchy enough - sew it closed edges tucked in to create the finished side.
3. On your Silhouette HD (sorry I don't own the Cameo) Open a new file. Choose your text option. Pick the text you want. Make the text size large enough for your pillow space (I wish I would have made my text larger).
You will then need to flip your text backwards: Open your Replicate Window {upper right}. Then choose Mirror Left. This will make your text go backwards & delete the original text...yes you want the backwards text, trust me.
 Pick the "thin media" option, blue blade tip and load your wax paper {wax side up} onto your sticky mat. And cut.

*3. {For those who don't have a Silhouette} On your computer, open a word document and create your text words in the font & size that you want. Attach your wax paper {wax side down} to your screen. This will create a light box effect. Trace your letters with a pencil and then exact-o knife them out on a cutting board. *Remember the more detailed or fancy the font is the more detailed your cuts will have to be.*

You can get rid of the actual letters, but be sure to keep all the little pieces, like the insides of the "e" or "o" for the next step.
4. Place your pillow on the ironing board and place the wax paper {wax side down} onto your pillow (your words shouldn't be backwards now). Press a warm iron down on your wax paper. The heat of the iron will melt the wax of the paper and create a temporary bond. Don't forget to iron on the dots that create the centers of "e"'s or "p"'s etc.
5. Once the stencil is in place on the pillow you can brush on the paint to evenly cover the words. Be sure to have full coverage with the paint, but don't push it too much with the outer edges {sometimes the paint will sneak under the edge and it won't look clean}.
6. Let dry. Once the paint is set {it can be a little tacky} pull off the wax paper and Ta-Da! You have your wording.
7. I had some extra scraps of fabric and created flowers and flower buds for my pillow. Mine were really simple, but I recently found a great gathering of fabric flower tutorials on Kojo Designs.

There you have it! Put it on your bed or put it in a gift bag! Enjoy!

I know I made this kind of a quick tutorial if you have questions please feel free to ask or e-mail at shesaidblog@yahoo.com
Photobucket

Wednesday, February 1, 2012

Valentine Crafting — A Heartwarming (And Hand-Warming!) Gift

It's February, which means that Valentine's Day will be here before you know it!  These little rice-filled hand warmers are a quick and thoughtful gift to brighten the day of your sweetheart in a cold climate.  There are tons of tutorials online for making these, but this is how I made mine.


These don't take much fabric at all; I made mine from some scraps of leftover material from a Christmas project.  I used regular cotton fabric, but flannel would be dreamy, too.
 
Start by making your heart pattern.  You can print off a heart shape from your computer, or you can go old-school and make your own; to keep the heart symmetrical, fold your paper in half, then cut out the heart.  Be sure to account for seam allowances and adjust your pattern accordingly so that your finished product is the size you want.  (Here's an smart tip for adding seam allowances!)  I made my pattern from a Papa Murphy's Pizza flyer because it was handy. :)


You will need two hearts for each hand warmer and four hearts if you're making a set.

Place two hearts right sides together and sew, leaving a 1-inch opening for turning and stuffing.  I would recommend having your opening along a straight side edge.  When I made mine, I left the bottom open, which made sewing the point of the heart kind of tricky.

Trim your seams, clip your curves, and turn the heart right-side out.  If you need to, use a pencil (or one of your husband's fancy chopsticks, if you're me) to help poke the fabric through.  You can also use a knitting needle, but be careful not to jab it through your fabric and make a big hole.

Once your heart is turned right-side out, fill it with rice.  I used the regular ol' long grain stuff.  You may need to use a funnel or some rolled up paper to help you fill it.  You don't want it too full, just under halfway.  I used a little over 1/8 cup of rice to fill this one.


After filling, stitch your opening closed.  There you have it!  A lovely, Valentiney hand warmer to give away or keep for your own cold fingers.  Make another one (or fifteen if you have a lot of friends) so that the recipient can have one for each hand.

To use, pop your hand warmers in the microwave for a minute and then see how they feel.  If needed, nuke them a little longer.  You want them warm enough to be soothing but not hot enough to inflict burns.

These are pretty quick to whip up and if you make them assembly-line style, you will have a bunch of cute hand warmers for all of your Valentines in no time!!


 Photobucket

Tuesday, January 3, 2012

Post-Holiday Crafting: What to Do with Your Christmas Cards

Happy 2012, everybody!!

We hope your holidays were joyful and filled with family, friends, fun, and yummy food.  Now that the new year has started, you're probably in the process of putting away your Christmas decorations and trying to answer that age-old question:

What should I do with all of these Christmas cards?

Christmas cards are so much fun to send and receive, and if you're like me, you feel bad about just throwing them out when the holiday season ends.  I've found several different ideas online for reusing Christmas cards, but this one was my favorite.  Even better, it utilized my Silhouette SD Craft Cutter!  If you don't have a Silhouette, don't fret; you can do this with a pair of scissors, too. :)  With just a little bit of time, your Christmas cards can find new life as Christmas gift tags!

All you will need for this project are Christmas cards, scissors/craft cutter, and a gift tag template (or you can just eyeball it if you're really talented!).


I would not recommend using photo cards for this project -- it would be a little creepy to have somebody's face smiling up at you from a gift. (Unless it's John Lennon.  Then that would just be cool.)

Cut the fronts off of your cards -- you'll want to make sure the back side of the picture is blank.
Read the heartfelt sentiment on the inside of the card and then file it or trash it or whatever.

If you have a Silhouette, you can download gift tag templates to use, or you can design your own.
If you don't have a Silhouette, I'm sure you can find free templates online; you could also trace an existing gift tag, draw your own, or just freehand it.

Once you have your card fronts and your template, cut cut cut!  I was able to get 20 gift tags from four regular cards and two money-holder cards.


Save your tags for next Christmas, when you will amaze everyone with your creative, ecofriendly way for addressing your gifts.

What do you normally do with Christmas cards?

Photobucket

Friday, December 16, 2011

Christmas Crafting -- Easy Crocheted Dishcloth

Both Michelle and I learned how to crochet a long time ago, but over the last few years, I learned that I LOVE to crochet.  I really do.  I may not be quite as skilled as Kara, but I have a lot of fun making things for the people I love (and for myself, too!).  This year, I wanted something cute and quick that I could give to some people on my list, and I came up with this:


I looked at some other crochet dishcloth patterns and couldn't find one that was quite what I wanted, so I came up with my own!  If you know how to crochet, then you will have no problem with this pattern.  It's easy and pretty quick, too; I think the first one took me about an hour and the rest have gotten progressively quicker to do.

Here's what you're going to need:


Yarn, a crochet hook, and some time.

I used a size G crochet hook and this 100% cotton, worsted-weight yarn called "Yuletide" from Peaches & Creme.  I bought it at Walmart for less than $2 a skein and it is wonderful to use!  You can get about 1-1/2 dishcloths from one skein.

To make this dishcloth, you'll need to know how to crochet a V-stitch.  This is one of my favorite stitches to use, which is why I used it to create the pattern.  If you don't know how to V-stitch, you can find an explanation here.  These instructions only show how to make one row of V-stitches; when you work the next row, instead of inserting your hook into a stitch, you will put your hook underneath that middle Ch-1 and pull your yarn through the empty space in the middle of each V.

Please note: I have exactly zero experience writing crochet patterns, so please excuse my lack of professionalism. :)  If you have any questions at all, please email!!!!

Row 1: Chain 40.  In 5th chain from hook, DC, ch 1, DC (1 "V" made).  *Skip next 2 chains.  V-stitch in next chain.  Repeat from * until 12 V's have been made.  Skip 1 ch and DC in last chain.  Ch 3 and turn.

Row 2: V-stitch in each ch-1 space across until 12 V's have been made.  DC in top of turning chain from previous row.  Ch 3 and turn.

Can you see the little V's?
Repeat until desired size (I do 17 rows) and fasten off.

Ta-daaaa!!  You now have a cute dishcloth to give to somebody else or keep for yourself!

Who doesn't love a handmade gift?

Bring some Christmas cheer to your chores!

Download your "We Wash You a Merry Christmas" gift tag HERE

If you don't know how to crochet but want to learn how, I highly recommend Debbie Stoller's book  The Happy Hooker(Get your minds out of the gutter!  She's talking about crochet hooks!!)

Happy Crocheting!!

Photobucket 
Related Posts Plugin for WordPress, Blogger...
 

Template by Best Web Hosting