Showing posts with label How To. Show all posts

Wednesday, September 19, 2012

1 Ugly Painting 2 Cute Crafts : Canvas Sign


Remember this little bad boy I got a yard sale? Remember Part One of our transformations? Are you ready for part 2?
Well, grab that canvas & lets start making our:


Along with your canvas you will need:
Sandpaper
Scrapbook paper (5-8 12x12 sheets)
Vinyl Letters
 (I have a Silhouette cutter that I cut my letters with, but you can buy vinyl letters in any craft store)
Mod Podge
Sponge brush
Black Spray Paint

 
Here is our canvas! You want to sand down all of those leafy trees & happy clouds so the canvas has a smooth{er} surface. No need to sand the picture away because you are going to cover it anyways.
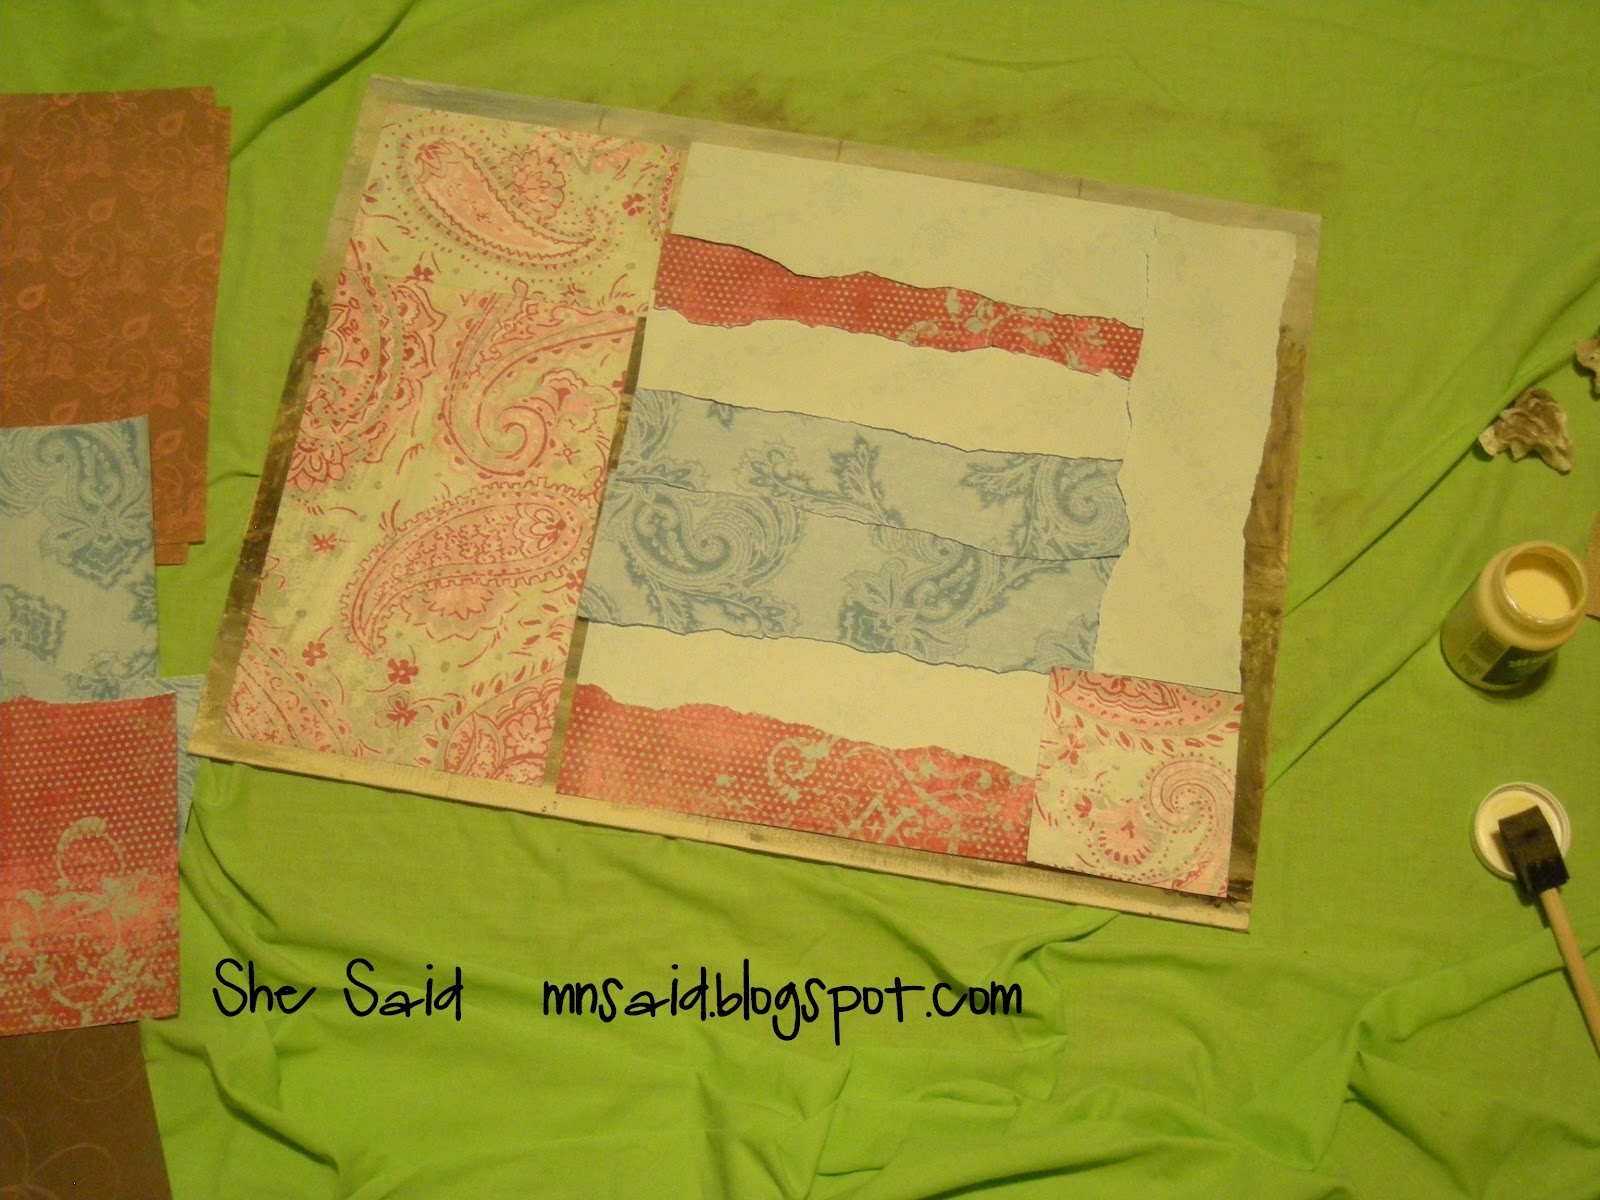
 
Once sanded you will apply your scrapbook paper to the canvas. Put a thin layer of mod podge on the back of the paper to make it stick and then brush mod podge over the top to seal it to the canvas. Now here is where you are going to let your creative juices flow. I wanted a bright/hippie-ish vibe with mine so I stuck with a color theme & chose a few different patterned papers. I ripped those papers and layered them over each other {with the exception of the top & a slight crack that got left open, but it worked out just fine, so ...I'm just going to say that I planned it that way} I used a Mod Podge with an antique finish on it because I wanted to add a bit of shabby-chic/vintage with my bright/hippie look.
{TIP}If you want an antique look, but don't want to buy antique mod podge? Coffee stain it. Get an old cup of strong coffee and after you have applied your scrapbook paper paint on the old coffee to the degree of brownness {is that even a word?} you want.
{TIP} I would suggest that you cover the entire canvas with scrapbook paper. It was late at night for me and I had limited coordinating papers to work with so I left a boarder of canvas around my paper. Cover it all, don't leave a boarder. I will point out why later on in the post.

 
Measure your canvas & figure out how large you want your letters. I wanted "home" to be the biggest and "you" to be the next. Pull out the ruler & start making notes. If you are like me, you want to get it right the first time!
{TIP} I cut pieces of scrap paper to the size that I want to make sure everything will fit when gauging how large letters should be. You don't have to cut each and every letter. Squares in the sizes that you want work out fine for figuring out spacing & room.
{TIP} Use vinyl that you don't want/like/need anymore/mismatched colors/on sale - you will see why later on.
 
Apply your vinyl letters
 
{TIP} I like to apply letters or words starting with the top and then doing the bottom, leaving the middle for last. I find that helps me with my spacing. Same thing for the letters in the words. When applying the "YOU" I did the O first so I could use the space wisely with the Y & U.


Now you have your sign and as you can see I ran out of vinyl & had to use some other pieces I had on hand. It really doesn't matter because once you have it on a tarp or drop cloth you will......
 
Spray paint the whole thing black. Yep. Cover that baby up with black, black, black. I wish I had taken a picture of Mr. S when I told him I was taking it out to spray paint it! He didn't know what I was doing, but I'll show you the method to my madness
{TIP} Do this step at night. That way you can let it dry and air out for a nice long time instead of anxiously testing it to see if it's still tacky. Spray it. Sleep and wake up to a nice, dry & less stinky canvas in the morning. Be sure to keep it away from timed sprinklers, neighborhood cats & trees that are dropping leaves.

In the morning bring it in and start peeling that vinyl off {you use and throw away alot of vinyl in this project} Do you see the awesomeness underneath??
I'm really happy with the two triple toned effect I got by layering papers and accidentally leaving a gap for the original painting to show through. I don't even mind the spray paint that eeked underneath the letter. It gives it that vintage/hippie/shabby chic effect that I wanted.
Please note: by leaving the canvas border and even doing multiple layers of paper will make your canvas uneven when looked at up close...do you see it. So cover your entire canvas and if you are using multiple papers be aware it won't be even, but still look uniform with that black paint.
And when you peel it all off you are left with this......

 Your canvas sign! Love it! Cherish it! Show it off to everybody that comes to your house! I'm debating on how to hang it. Part of me wants to use those tacky wall cling things so it's just mod and hanging there. Another part of me wants to attach ribbon and hang it with that - any input would be most appreciated.

 
So happy to share this with you and I would be excited to see if any of you do it!
If you make a sign PLEASE brag about it and post it on our She Said Facebook wall so I can smother you with compliments!
 
Missed out on Part 1 of our Ugly Painting remodel? Check out what I did with frame HERE


Photobucket

Tuesday, September 11, 2012

1 Ugly Painting 2 Cute Crafts : Memo Board


Welcome to our two-part series! Where we take this awesome piece of outdated beauty and turn it into something new....and pretty....and updated....

 
This isn't the actual picture of the painting, but it's pretty close & gives you the idea of what I saw at a yard sale earlier this summer. I snatched it up for a $1 and went home and pried it apart. I will be trading in this 1980's-esque painting and turning it into 2...that's right two! Cute crafts I will be happy to have hanging on my walls. Let's begin with.....
 
You will need:
Scissors
Hammer
Needle nosed Pliers
Staple Gun
Twine
cute Paint
paint brush
Sandpaper
 
Turn the painting over & remove any paper backing it might have {mine didn't have any, but more professional paintings do}. Remove the canvas...be careful because you will be using this later. To get my canvas out I had to take my needle nose pliers and pull out the little nails that held the canvas in. Once the canvas is out and placed in a safe place, behold your frame!!

 
Sand down your frames finish. I'm a very impatient person and hate sanding, but have yet to go to the supply store and buy that primer stuff, so ....sand it down. Paint your frame whatever sweet color your choose & let dry.

 
Once the frame is dry turn it face down {be sure there is something under it so the paint doesn't scratch} and grab your staple gun, twine & hammer. Take the end of the twine and staple it to your starting point at the bottom {or top} corner of your frame. Keeping it tight go back and forth from one end of the frame to the other with the twine creating a zig zag pattern, stapling your twine at each end of the frame. It is important that the twine stays tight {think guitar strings} so it can hold up a picture clipped to it. For me the staples didn't hold the twine down enough. I pulled out the hammer and after I would staple the twine in place I would hammer down the staple securing the twine down against the frame.

 
Turn it over & hang it up {I chose to keep the original wire hanger}. Add a few pictures clipped with clothes pins and you are ready to go!


I've seen some people add rolled fabric flowers to the corners which I think is adorable, but this is in the kitchen and I knew Mr. S wouldn't be as excited about the cuteness as I would so I just left mine mod & plain.


It now is home to Baby S's artwork, photographs & baby announcements . I love it!! I hope you do too. Another bonus on this craft is that it is easily done in an afternoon {as long as you are painting with acrylic paint!}.

Stay tuned for Part 2 and see what I do with the canvas!!


Photobucket

Friday, May 25, 2012

Can you feel the love tonight?

There is something about rainy days that bring out the crafting bug in me. It is cold, wet & dreary outside but inside it can be warm, happy & crafty! So today, this rainy, wet day - I share with you a craft...a fun {slightly naughty}craft.

I made this for a dear friend of mine for her bridal shower and since June or "The Month of Marriage" is just around the corner I thought you would enjoy a quick, easy & fun shower gift!

This double sided pillow is easy to make and is great at re-purposing items you have around the house.
"The Honeymoon Pillow"

One side says Tonight
The other side says Not Tonight

Great right? Are you already thinking of who to make one for {maybe it's yourself!} Let's get to it!
You will need:
Pillow to re-cover or pillow form
Fabric {I actually used a large shirt for the pillow pictured. It was the perfect shade of gray & it was very soft} you will need to have enough fabric to cover your pillow.
Sewing Machine
Wax Paper
Silhouette HD (or an exact-o knife)
Iron & Ironing Board
fabric paint & sponge brush

1. Make a simple pillow cover. Place the right sides of the fabric together sewing three sides.
2. Slip the pillow inside of the cover and either hand stitch it closed or -in my case the fabric was stretchy enough - sew it closed edges tucked in to create the finished side.
3. On your Silhouette HD (sorry I don't own the Cameo) Open a new file. Choose your text option. Pick the text you want. Make the text size large enough for your pillow space (I wish I would have made my text larger).
You will then need to flip your text backwards: Open your Replicate Window {upper right}. Then choose Mirror Left. This will make your text go backwards & delete the original text...yes you want the backwards text, trust me.
 Pick the "thin media" option, blue blade tip and load your wax paper {wax side up} onto your sticky mat. And cut.

*3. {For those who don't have a Silhouette} On your computer, open a word document and create your text words in the font & size that you want. Attach your wax paper {wax side down} to your screen. This will create a light box effect. Trace your letters with a pencil and then exact-o knife them out on a cutting board. *Remember the more detailed or fancy the font is the more detailed your cuts will have to be.*

You can get rid of the actual letters, but be sure to keep all the little pieces, like the insides of the "e" or "o" for the next step.
4. Place your pillow on the ironing board and place the wax paper {wax side down} onto your pillow (your words shouldn't be backwards now). Press a warm iron down on your wax paper. The heat of the iron will melt the wax of the paper and create a temporary bond. Don't forget to iron on the dots that create the centers of "e"'s or "p"'s etc.
5. Once the stencil is in place on the pillow you can brush on the paint to evenly cover the words. Be sure to have full coverage with the paint, but don't push it too much with the outer edges {sometimes the paint will sneak under the edge and it won't look clean}.
6. Let dry. Once the paint is set {it can be a little tacky} pull off the wax paper and Ta-Da! You have your wording.
7. I had some extra scraps of fabric and created flowers and flower buds for my pillow. Mine were really simple, but I recently found a great gathering of fabric flower tutorials on Kojo Designs.

There you have it! Put it on your bed or put it in a gift bag! Enjoy!

I know I made this kind of a quick tutorial if you have questions please feel free to ask or e-mail at shesaidblog@yahoo.com
Photobucket

Sunday, April 22, 2012

If You Have 5 Minutes: Clean Your Microwave {earth friendly way!}

Happy Earth Day!!
source
To celebrate Earth Day I am sharing with you my favorite, easy & earth friendly {i.e. no chemicals} way to clean out your microwave and then BEST part is....it will only take you 5 minutes! Yep! 5 minutes to have a sparkling, happy, good smelling, chemical free microwave!

Does your microwave look like this right now? {please say that it does so I don't feel like I'm the only one}
Start the clock at 5 minutes!


5 Minutes: Combine one part Lemon Juice with two parts Water in a microwave safe dish {there are alot of pins on Pinterest for one that calls for vinegar - I'm sure that works too, but lemon juice smells better I think}
4 Minutes: Wash and dry the microwave turn table tray and replace back in the microwave
3 Minutes: Put your lemon water mixture into the microwave for One Minute and grab some paper towels while it's going
2 Minutes: Using paper towels, wipe down the inside of the door, sides, top & bottom of the microwave. The steam that has been created by your lemon water has helped loosen the grease and grime in the microwave.


1 Minute: Still some gunk in there that won't get off? Add 2 more minutes of time by re-microwaving your lemon water mixture and wiping it down again. OR take some time to wipe down the outside of the microwave handle, key pad & door. And there you have it! A clean microwave.

Here are some more earth-friendly posts that we have shared on She Said
Green Packaging using magazine pages

Clothing Swap! Instead of throwing it away swap it with a friend

Dry Erase Book - repurposing an old board book for a new use

Photobucket

Friday, March 23, 2012

Green Packaging


Phew....how quickly a month has gone by!!! Sorry for the delay in posting, but life is life here in our neck of the woods. Between me recovering from that awful cough cold that has been going around in time for my performance in Steel Magnolias and Nan's laptop crashing and waiting for a new one to come in the mail time has gotten away from us.
But we are back...what did we miss?

In honor of our past holiday of St. Patricks day (did you wear green? I did. Even baby S. celebrated by having green coming out of his nose) I'm taking my own twist by focusing on the word GREEN. With some
                                                 Green Packaging.
Next time you want to mail a box and throw out some magazines, take a second and make that box look really special/festive/fun to open...I think tax documents should come this way {so I wouldn't drag my feet to do them}


All you will need is:
The package you are going to send.
Magazine paper(s) that have a great pattern/picture/colors on it
Sissors
Tape

I sent this package to one of our lucky winners of a previous giveaway we hosted. I found this magazine page that had sweaters, scarfs & purses in really cute fun colors. Since the box was small I just needed two sheets. For larger boxes have more than one sheet to cover it all - you don't want any boring brown to show!


Choose what page you want as your front. I wanted the really brightly colored one so I used another sheet that had a really cute dress on the back. Tape it onto the box like you would wrapping paper.


There you go! A bright, cheery, package to send to someone special. You are happy sending it. The recipient is happy getting it and the earth is happy that you reused something. {Psst if you still need to see some actual Green look at the lower right corner...there is green there!)

Photobucket

Saturday, February 4, 2012

For the love of nailpolish


You know how much I love nail polish!! L.O.V.E. it (are you listening OPI?) So when I saw these great Ombre nails on Pinterest I had to try it out. I thought it would be perfect for Valentines. There are two ways to achieve these Ombre nails.

1. Take all of your nail polishes and organize them by color. You want to arrange a color palette that goes from dark to light. If you have enough nail polishes to do that - you got it! Paint each nail one of the shades going in order from light to dark....or dark to light, it's up to you.

2. For a more "true" ombre effect I followed this tutorial from Pretty Young Thingz and I really like the results!
You will need:
Your nail polish color that you want
Some white nail polish (I grabbed a white/creamy/glittery one) - you will use this to lighted the color as you go
a Paper plate
Toothpicks
Good Move/TV show (I did this while I watched Downton Abbey....highly recommend!)

1. Clean off the nail polish brush with nail polish remover
2. Brush your thumbs with your chosen color ** normally when I paint my nails I do one hand and then the other. Since you will be creating lighter shades as you go it easiest to paint both hands at the same time**
3. Put some of that color on a paper plate and put a drop or two of the white polish. Mix together with a toothpick and you now have a lighter shade to put on the the pointer fingers.
4. Then put another two drops into the nail polish on the plate and mix with a tooth pick. Now you have an even lighter shade that goes on the next nail. Repeat this step for the rest of the nails. Adding a drop or two of the white to your nail polish color on the plate creating a lighter color as you go until you reach your pinkie.
5. When you are finished let dry & finish with a top coat.


There you go. Awesome looking nails and a pretty easy process to do it.


I don't know about you, but I am on the hunt for a really good top coat polish something that has some staying power, but doesn't need 100% Acetone to take it off (i.e. those gel top coats that are floating around) if you know of one shoot it my way. 

Photobucket

Friday, January 13, 2012

5 Tips to Attack the Cold/Flu


You are enjoying a peaceful evening with your family in your suburban home. You begin to notice your husband's constant sniffling, you hand him a tissue and quickly disregard it as "a bit of dust". Then your child starts coughing. "Are you okay, dear?" you inquire. "Fine, Mommy," is Timmy's reply, "Johnny bet me ten cents that I wouldn't lick the classroom doorknob - I showed him!" You are about to tell him he shouldn't be licking doorknobs when you feel a slight tickle in your throat and then you realize - you are being INVADED!!! dun.dun.dun

It's cold/flu season! There is just no way around it. Personally, I got over it just last week & while I kept my Kleenex stockpile up I wondered, "is there any way to escape this?" The short answer is: No, but there are ways to help you when you get invaded.

1. Stay home!! Sure, it's not fun to stay home from book club, but what is worse: missing one night of chit chat that you can barely hear from your headache, or being referred to as "the gal who kept sneezing on things"? Honestly, you got sick because someone couldn't keep their germs at home. Stop the cycle by keeping yours to yourself.

2. Pull out the soap. "Aim for at least four hand washings a day. Other than getting the vaccine, frequent hand washing is the most effective way to protect against the flu," says Thomas Saari, M.D. Hand sanitizer is great in a pinch when you are in a place without running water & soap, but if you have the choice and/or there is visible dirt, choose the soap and water.

3. Turn up the heat. Heat is a speedy way to kill germs. When someone in our family is sick I run our dishwasher on heat dry as an extra precaution to make sure our dishes are really clean. You can also run some children's toys on the top rack of the dishwasher, too. I am usually a cold water person when it comes to washing our clothes, but if we are sick I will run a few loads on hot water.  Don't want to use that much hot water on your family laundry? Consider doing it with just a load of "infected" laundry. While we are on the subject of laundry, a friend of mine (a school teacher) always has her family change their clothes when they come home from school...if you think of it, that is a lot of germs you are putting in the laundry basket and away from the rest of the house.

4.  Wipe it to swipe it. "Viruses can survive up to three days on surfaces and inanimate objects," says Chuck Gerba, a professor of environmental microbiology at the University of Arizona in Tucson. Focus on "Hot Spots" around the house that get touched/used a lot (doorknobs, switches, handles, phones, counters, remotes, etc.) with your favorite disinfecting product that contains alcohol.

5. Sharing is not caring. There is the popular adage "We are a family that shares everything...even our germs".  Be sure that children don't share things like cups, utensils or anything they would put their mouth on. If the patient can have commonly shared items that they can claim as their own(cup, blanket, etc.) & can't be confused with others that can help cut down on the germ spreading quite a bit. One thing my Mom did was to color code our cups - mine was red and didn't get confused with my yucky brothers green cup. It also helps if the patient can have their own space to sleep (space permitting) especially if they share a room with other siblings. Giving them (or you) that space can help keep germs from spreading and give a quieter environment to re-coop in. 

*6* Mother knows best. Hate to admit it, but the three sure things to help you get over that bug: lots of water, SLEEP & chicken noodle soup...my Mom told me that all the time, but for some reason it didn't really sink in until I got older.


Do you have any home remedies? Please share!
Hope you get feeling better soon!!

Photobucket

Thursday, December 2, 2010

How To...Paint Your Kitchen Cupboards

After this post, we had a question in the comments about painting kitchen cupboards, so I thought I'd share our experience with you.  We are by no means professionals, so this may or may not be the "right" way to refinish cupboards, but it's the way that worked for us.

When we bought our house, our kitchen cupboards were an ugly, scratched, dark brown.  I had already been dreaming of a dark blue kitchen with white cupboards, so I had no qualms about painting them.  I did a little bit of reading online, then dove right in.  We had four basic steps, after removing the doors:
1 - Wash
2 - Sand
3 - Prime
4 - Paint

Wash: Really take your time with this step.  We just kind of lightly wiped them down, and this worked okay for some areas and not so well for others.  If there's some grease buildup (which there will be in a kitchen), make sure you clean all of that off so that the paint sticks well; we didn't clean the doors above the stove as well as we should have, and the paint cracked, so really get those puppies clean!  See if you can find a detergent with TSP in it to cut through the grime.

Sand: Don't worry about sanding everything down to bare wood, just sand enough to rough up the surface so that the paint will stick better.  We used both sandpaper and steel wool for this step.  If there are any areas that were hard to clean, sand these really well.

Prime: I don't remember what brand of primer we used, but make sure that it is good at covering dark finishes.

Paint: This is the most time-consuming part of the whole process.  We used a glossy finish white paint, but I think semigloss or satin finish would work just as well.  After some experimentation, we discovered that foam rollers and brushes were the best for this job; they leave a relatively smooth finish and are easy to work with.  We just bought ours at the dollar store.  I think we did two coats of paint on our cupboards.  We didn't paint the insides of the cupboards themselves, but we did paint both sides of the cupboard doors.

Optional -- Add a clear protective coat: We didn't do this, but our paint job has held up just fine over the last five years.  It will add a little bit of protection, though, especially if you have sticky little fingers touching the cupboards.

So, was it a big project?  Yes.  Am I happy with the way it turned out?  Yes.  Would I do it again?  Probably.  Now that we've done it once and have learned from our mistakes, I think I'd be willing to try it again.  Take your time and you'll do just fine.  Have fun sprucing up your cupboards!

We don't really have any photos of the kitchen as we were painting the cupboards, so I'll just re-post the "after" picture. :)

Photobucket
Related Posts Plugin for WordPress, Blogger...
 

Template by Best Web Hosting