Showing posts with label Valentines. Show all posts

Friday, February 8, 2013

For the Love of: Pinterest

February, the month of love! This month we are going to focus on those little things in life that we LOVE.
Like Pinterest. Ah, Pinterest. Mr. S will always make jokes that it's my "pinography". I love it. I can't deny it. Going on and finding that awesome pin for an amazing craft, fabulous household tip or the drool worthy picture of what you hope to be cooking one day, Pinterest offers a bevy of ideas for the crafter, cook, reader, art lover, etc.
In honor of our love for Pinterest Nan & I will share with you 3 out of the gazillion pins we love a lot:

Michelle:
Tidy Mom's Baked Peanut Butter Oatmeal!
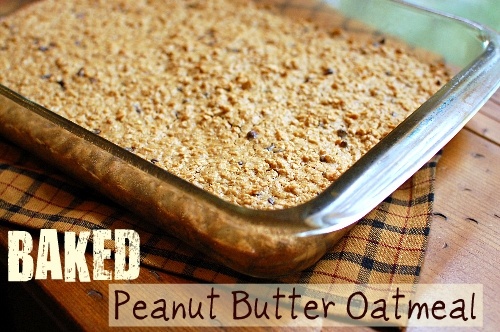
Baked Peanut Butter Oatmeal pan
{photo by Tidy Mom}
I cannot tell you how many mornings this has been made for breakfast, but I can tell you that a full batch lasts about two...possibly three breakfasts. Baby S is a big oatmeal fan and this is most requested in the mornings. I don't blame him, it tastes like a cookie, but with only a 1/4c Sugar it makes it a guilt-free breakfast option. Thank you Tidy Mom, this has been a well used Pin.

My Kitchen Table Pin Board
Pinned Image
{Photo Credit: Google}
That is one of the things that I love about Pinterest is being able to plan. I wish it had been around for my wedding, when we bought our first house, etc. You can create boards for future ideas/hopes/plans and when the future becomes the present, all of your "I Want/Need/Wishes" are in one place where they can't be forgotten. I come from an Italian family and the kitchen table is a very important place. We are currently enjoying a Bi-Mart $100 table & chairs special that is starting to show that it won't be around very much longer. The next table we get I want to really invest in. Something that lasts a long time & everyone can fit around. I have a board dedicated to kitchen tables and I know that I'm not alone in this quest for the "perfect fit" because I have quite a few fellow kitchen table lovers that follow the board.

Handy Dandy Advice

{Photo Credit: Dan Pearce from Single Dad Laughing}
There is quite a bit of advice out there. The best way to clean your towels, 150 ways to use hydrogen peroxide, quick hair up-do's, etc. I've used quite a few of the tips I've pinned and some have worked out really well like, how to bring butter & eggs to room temperature quickly by My Baking Addiction and some not so well like spraying brown sugar in my hair and letting dry to straighten it with out heat {my hair felt sugary and it wasn't straight}. My latest handy dandy advice article that I read was this one from Single Dad Laughing it was really insightful and made me laugh.

Pinterest Love Honorary Mention: I feel like I've been dressing better. I wish I had all the outfits that I've pinned in my closet, but I think I'm getting some great ideas {staying away from mom jeans}. In fact, I was out and a friend told me, "You look so cute. You look like an outfit off of Pinterest" I loved it!!

Nan
Baking Tip!
Image from The Pink Peony of Le Jardin


This baking tip from The Pink Peony of Le Jardin changed my life!!  You may think I'm exaggerating, but I'm not.  It's so simple: when making bread, set your bowl or pan on top of an electric heating pad during the rising time.  Your dough will rise faster!!  I love baking, but I've often struggled with getting my dough to rise like it should.  Maybe my kitchens have always been too drafty or something.  I don't know why I never thought of this before, but I use my heating pad almost every time I make bread now.  I usually bake some freezer rolls to go with our Sunday dinner, and they can be ready for oven in jiff when I use my heating pad.  I don't want to sound melodramatic here, but seriously: grateful for Pinterest just because of this pin alone!

Perfect Pasta
Image from Skinny Taste


I think everybody and their dog pinned this recipe at some point -- Cajun Chicken Pasta from skinnytaste.  I finally made this a few months ago and it is divine!  I love, love, love this pasta.  It's packed with flavor and vegetables -- how can you go wrong?  There's some prep time involved -- lots of veggies to slice up -- but it doesn't take too long and is well worth the effort.

Recipe runner-up: Skinny Texas Cheese Fries, also from skinnytaste.com.  Make them.  Love them.  Again and again.

Giggles
Image from lolsotrue.com
(And the story of my life...seriously)


I have an entire board of things that I like or things that make me laugh, like this little gem.  If I'm having a tough day or I'm in a bad mood, I look through the pins on this board and I feel so much better.

What are your favorite pins?

Photobucket

Saturday, February 4, 2012

For the love of nailpolish


You know how much I love nail polish!! L.O.V.E. it (are you listening OPI?) So when I saw these great Ombre nails on Pinterest I had to try it out. I thought it would be perfect for Valentines. There are two ways to achieve these Ombre nails.

1. Take all of your nail polishes and organize them by color. You want to arrange a color palette that goes from dark to light. If you have enough nail polishes to do that - you got it! Paint each nail one of the shades going in order from light to dark....or dark to light, it's up to you.

2. For a more "true" ombre effect I followed this tutorial from Pretty Young Thingz and I really like the results!
You will need:
Your nail polish color that you want
Some white nail polish (I grabbed a white/creamy/glittery one) - you will use this to lighted the color as you go
a Paper plate
Toothpicks
Good Move/TV show (I did this while I watched Downton Abbey....highly recommend!)

1. Clean off the nail polish brush with nail polish remover
2. Brush your thumbs with your chosen color ** normally when I paint my nails I do one hand and then the other. Since you will be creating lighter shades as you go it easiest to paint both hands at the same time**
3. Put some of that color on a paper plate and put a drop or two of the white polish. Mix together with a toothpick and you now have a lighter shade to put on the the pointer fingers.
4. Then put another two drops into the nail polish on the plate and mix with a tooth pick. Now you have an even lighter shade that goes on the next nail. Repeat this step for the rest of the nails. Adding a drop or two of the white to your nail polish color on the plate creating a lighter color as you go until you reach your pinkie.
5. When you are finished let dry & finish with a top coat.


There you go. Awesome looking nails and a pretty easy process to do it.


I don't know about you, but I am on the hunt for a really good top coat polish something that has some staying power, but doesn't need 100% Acetone to take it off (i.e. those gel top coats that are floating around) if you know of one shoot it my way. 

Photobucket

Wednesday, February 1, 2012

Valentine Crafting — A Heartwarming (And Hand-Warming!) Gift

It's February, which means that Valentine's Day will be here before you know it!  These little rice-filled hand warmers are a quick and thoughtful gift to brighten the day of your sweetheart in a cold climate.  There are tons of tutorials online for making these, but this is how I made mine.


These don't take much fabric at all; I made mine from some scraps of leftover material from a Christmas project.  I used regular cotton fabric, but flannel would be dreamy, too.
 
Start by making your heart pattern.  You can print off a heart shape from your computer, or you can go old-school and make your own; to keep the heart symmetrical, fold your paper in half, then cut out the heart.  Be sure to account for seam allowances and adjust your pattern accordingly so that your finished product is the size you want.  (Here's an smart tip for adding seam allowances!)  I made my pattern from a Papa Murphy's Pizza flyer because it was handy. :)


You will need two hearts for each hand warmer and four hearts if you're making a set.

Place two hearts right sides together and sew, leaving a 1-inch opening for turning and stuffing.  I would recommend having your opening along a straight side edge.  When I made mine, I left the bottom open, which made sewing the point of the heart kind of tricky.

Trim your seams, clip your curves, and turn the heart right-side out.  If you need to, use a pencil (or one of your husband's fancy chopsticks, if you're me) to help poke the fabric through.  You can also use a knitting needle, but be careful not to jab it through your fabric and make a big hole.

Once your heart is turned right-side out, fill it with rice.  I used the regular ol' long grain stuff.  You may need to use a funnel or some rolled up paper to help you fill it.  You don't want it too full, just under halfway.  I used a little over 1/8 cup of rice to fill this one.


After filling, stitch your opening closed.  There you have it!  A lovely, Valentiney hand warmer to give away or keep for your own cold fingers.  Make another one (or fifteen if you have a lot of friends) so that the recipient can have one for each hand.

To use, pop your hand warmers in the microwave for a minute and then see how they feel.  If needed, nuke them a little longer.  You want them warm enough to be soothing but not hot enough to inflict burns.

These are pretty quick to whip up and if you make them assembly-line style, you will have a bunch of cute hand warmers for all of your Valentines in no time!!


 Photobucket

Wednesday, February 9, 2011

Lucky & Love

We LOVE that so many of you entered and LOVE  all of our new followers!!! The LUCKY one to get this banner from Paramore Art Works according to Random.org is

Darwin & Candace Johnson said...

I'm a follower :)


Congratulations Candace! Be sure to send us your contact information to shesaidblog@yahoo.com and we'll be sure to get that banner out to you! And a big THANK YOU to Beth at Paramore Art Works for providing such a beautiful banner (if you haven't checked out her etsy shop...ya need to!)

As you know Valentines is just around the corner (hello only 4 more days!!!). So if you are in need of a few ideas to make in time for "The Day of Love" here's some inspiration!

I did this last year for Mr. S. & it was cheap, quick & soooooo cute! I snagged the idea from my friend Anna and she found it on Martha Stewart (she's so crafty) website. It's her Felt Fortune Cookies. So stinkn' adorable. Make a few, put them in a take out box with a big tag that says "I'm so Fortunate to Have you!!"

A few of my friends and I are going to get together this weekend and make these Cookies for our hubbies!! They were created by Shelly at How Does She. These cookies aren't for the easily offended, but they are sure to make your hubby blush!

The Chocolate Ravioli Hearts from Hungry Happenings are pretty sweet treat!

What woman doesn't want flowers on Valentines? What woman doesn't want chocolate? Anne over at Floral Showers gives you her tutorial on how to mix the two together with the Hershey Kiss Rose

Want a non-chocolate dessert for Valentines (crazy to think of a world without chocolate, but for some it is a reality) Candace at Simple Home Gourmet shares her Panna Cotta recipe.....it's a MUST TRY (I can eat a whole bowl of the stuff)

Other blogs to scour for awesome ideas : Love Actually & The Dating Diva's. They are two great sites that focus on making marriage fun!!

Have a great weekend!!


Photobucket
Related Posts Plugin for WordPress, Blogger...
 

Template by Best Web Hosting